
A Glute Stretch is a simple lower-body stretch that lengthens the muscles around your buttocks and hips. It can be particularly useful after Squats, Lunges, running, lower-body workouts, or other activities that heavily involve the glutes.
One of the most accessible versions is the lying Figure-Four Glute Stretch. It allows you to control the intensity easily while keeping your upper body supported on the floor.
Glute Stretches require little to no equipment and can easily be included in a post-workout stretching routine, mobility session, or general flexibility program.
What Is a Glute Stretch?
A Glute Stretch is a flexibility exercise designed to place the gluteal muscles and surrounding hip tissues into a lengthened position.
Several variations exist, including lying, seated, standing, and Figure-Four stretches. In the lying Figure-Four variation, you cross one ankle over the opposite thigh and gently draw the supporting leg toward your torso.
Glute Stretches are commonly used in:
- Post-workout stretching
- Lower-body flexibility routines
- Hip mobility sessions
- Leg-day cool-downs
- Running cool-downs
- Calisthenics training
- General mobility routines
The goal is to create comfortable muscular tension around the glutes and hip rather than forcing your leg into the deepest possible position.
Benefits of the Glute Stretch
Glute Stretches can provide several useful flexibility and mobility benefits when performed consistently and under control.
Benefits include:
- Stretches the gluteal muscles
- Improves or maintains hip flexibility
- Can reduce the feeling of muscular tightness
- Encourages comfortable hip movement
- Complements lower-body strength exercises
- Can be modified for different mobility levels
- Requires minimal equipment
- Fits easily into post-workout routines
Static Glute Stretches generally fit better after training or during a separate flexibility session than immediately before demanding strength, sprinting, or explosive exercise.
Muscles Stretched During the Glute Stretch
The exact muscles emphasized depend on the variation, hip angle, and your individual anatomy.
Primary Muscles
- Gluteus Maximus
- Gluteus Medius
Secondary Muscles
- Gluteus Minimus
- Deep Hip External Rotators
Some Figure-Four variations may also create a noticeable stretch through other tissues around the back and side of the hip.
How to Do a Glute Stretch (Step-by-Step)
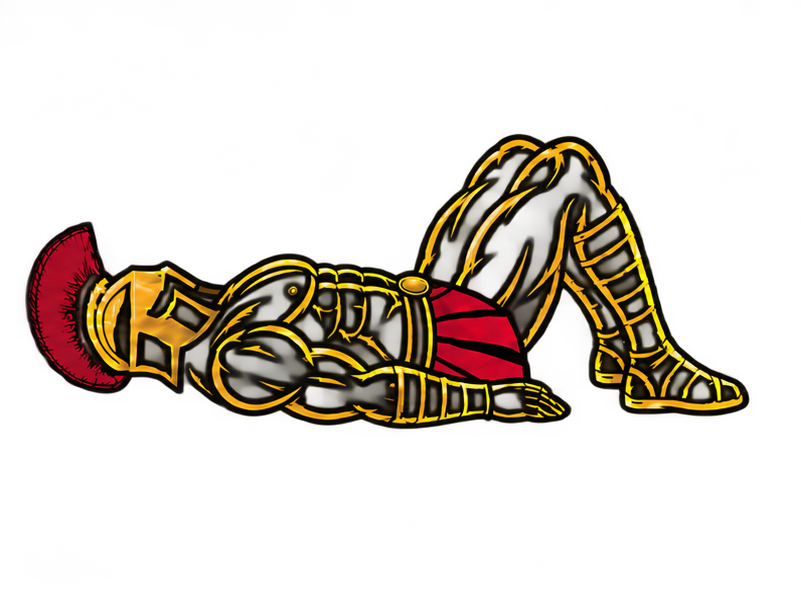
Step 1: Lie on Your Back
Begin by lying face-up on an exercise mat or another comfortable surface.
Bend both knees and place your feet flat on the floor.
Keep your:
- Head relaxed
- Neck neutral
- Shoulders comfortable
- Lower back in a natural position
- Legs relaxed
Avoid unnecessarily tensing your upper body.
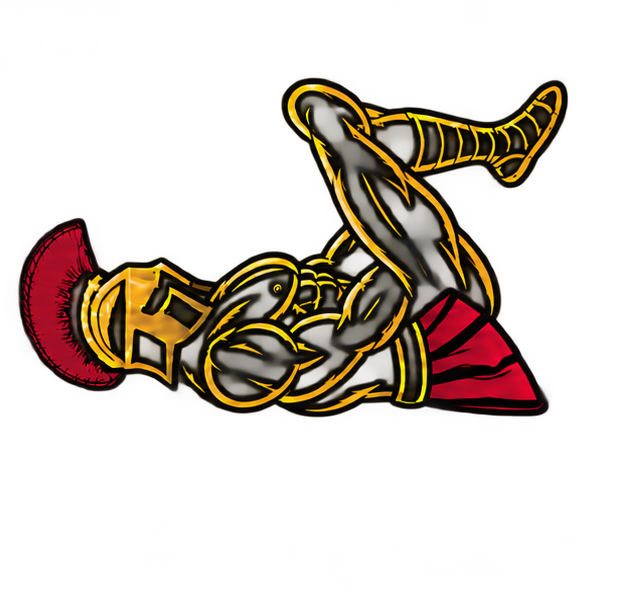
Step 2: Cross One Ankle Over the Opposite Thigh
Lift one foot and place your ankle across the opposite thigh, slightly above the knee.
Your legs should now resemble a Figure-Four position.
Keep the crossed foot controlled rather than aggressively forcing the knee outward.
Step 3: Reach Behind the Supporting Thigh
Lift the supporting foot slightly from the floor.
Reach both hands around the back of that thigh and gently hold it.
If comfortable and accessible, you can alternatively hold around the shin, but holding behind the thigh is often easier for beginners.
Avoid pulling directly on your knee joint.
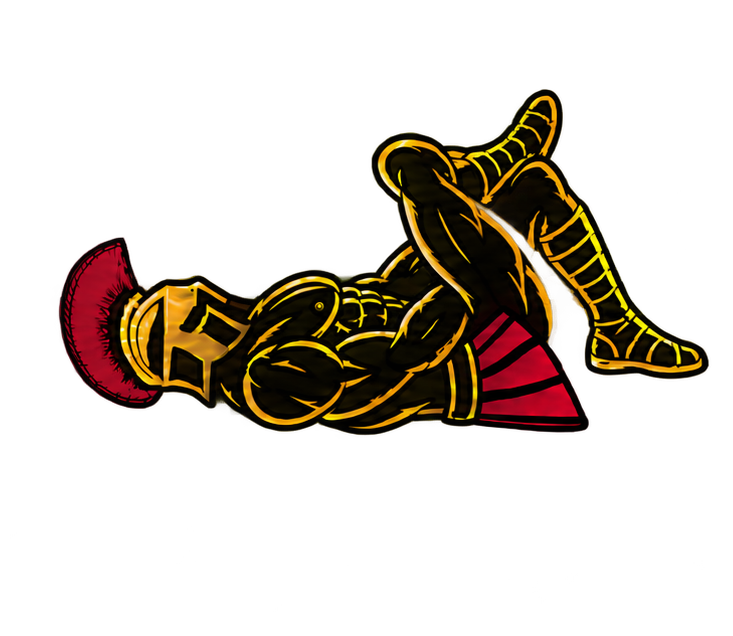
Step 4: Draw the Leg Toward Your Torso
Slowly pull the supporting thigh toward your chest.
As the leg moves closer, you should begin to feel a stretch through the glute and hip of the crossed leg.
Maintain:
- Relaxed shoulders
- Neutral head position
- Controlled breathing
- Comfortable hip position
- Gentle stretch intensity
Do not jerk your leg toward your body.
Step 5: Adjust the Stretch
Continue drawing the supporting leg toward you only until you feel a comfortable stretch.
You may gently allow the knee of the crossed leg to move away from your torso, but do not force it downward with your hand.
The stretch should be felt mainly around the glute and hip rather than as pressure in the knee.
Step 6: Hold the Position
Hold the stretch for approximately 15-30 seconds while breathing normally.
Avoid bouncing or repeatedly pulling yourself deeper into the position.
Keep the stretch steady and controlled.
Step 7: Release and Switch Sides
Slowly release your supporting leg and return both feet to the floor.
Uncross your leg and repeat the same sequence on the opposite side.
Try to use a similar duration and comfortable intensity for both sides.
Glute Stretch Form Checklist
Use this quick checklist to maintain proper Glute Stretch technique.
- Lie comfortably on your back
- Bend both knees
- Cross one ankle over the opposite thigh
- Keep the crossed ankle above the knee
- Hold behind the supporting thigh
- Draw the supporting leg toward your torso gradually
- Keep your head and shoulders relaxed
- Breathe normally
- Use a comfortable range of motion
- Keep the movement controlled
- Avoid bouncing
- Do not force the crossed knee downward
- Stretch both sides
- Stop if you experience sharp or unusual pain
You should feel controlled stretching tension around the glute and hip rather than pain in the knee or hip joint.
Common Glute Stretch Mistakes
Pulling Too Aggressively
Problem: Trying to force the supporting leg as close to your chest as possible can make the stretch unnecessarily intense.
Fix: Pull gradually and stop when you reach a comfortable stretching sensation.
Pressing Down on the Knee
Problem: Using your hand to aggressively push the crossed knee away can place unnecessary stress on the joint.
Fix: Allow the hip to open naturally and adjust the stretch primarily by moving the supporting leg toward your torso.
Placing the Foot Directly on the Knee
Problem: Resting the crossed ankle directly on the knee joint may create unnecessary pressure.
Fix: Place your ankle across the opposite thigh just above the knee.
Lifting the Head and Shoulders
Problem: Tensing your neck and repeatedly lifting your head from the floor can make the stretch less comfortable.
Fix: Keep your head and shoulders supported and relaxed whenever possible.
Bouncing Into the Stretch
Problem: Repeated bouncing makes it harder to control the intensity of a static stretch.
Fix: Move gradually into the position and maintain a steady hold.
Holding Your Breath
Problem: Holding your breath creates unnecessary tension during the stretch.
Fix: Breathe slowly and naturally throughout the entire hold.
Stretching Through Pain
Problem: Sharp, pinching, burning, or unusual joint pain is different from normal muscular stretching tension.
Fix: Reduce the range or stop the stretch if you experience pain. Persistent or worsening hip, knee, or radiating leg symptoms may require appropriate professional assessment rather than deeper stretching.
Glute Stretch Variations
Several Glute Stretch variations can be used depending on your mobility, environment, and preferred position.
Lying Figure-Four Glute Stretch
This is the standard beginner-friendly variation described above.
How to Do a Lying Figure-Four Glute Stretch
- Lie on your back with both knees bent.
- Cross one ankle over the opposite thigh.
- Reach behind the supporting thigh.
- Draw the leg gently toward your chest.
- Hold the stretch comfortably.
- Release slowly.
- Repeat on the opposite side.
Seated Figure-Four Glute Stretch
This variation can be performed on a chair or bench.
How to Do a Seated Figure-Four Glute Stretch
- Sit upright on a stable chair.
- Place one ankle across the opposite thigh.
- Keep your spine long.
- Hinge slightly forward from your hips.
- Stop when you feel a comfortable glute stretch.
- Hold before switching sides.
Avoid aggressively rounding your back simply to move farther forward.
Standing Figure-Four Glute Stretch
This variation adds a balance component.
How to Do a Standing Figure-Four Glute Stretch
- Stand upright near a stable support.
- Shift your weight onto one leg.
- Cross the opposite ankle over your supporting thigh.
- Push your hips backward.
- Bend your supporting knee slightly.
- Lower only until you feel a comfortable stretch.
- Hold onto a stable surface if necessary.
- Repeat on the other side.
Pigeon Stretch
This is a more demanding floor-based variation that requires greater hip mobility.
How to Do a Pigeon Stretch
- Begin on your hands and knees.
- Bring one knee forward.
- Position the lower leg in a comfortable angle in front of your body.
- Extend the opposite leg behind you.
- Keep your hips controlled rather than forcing them square.
- Remain upright or gradually lower your torso if comfortable.
- Hold before changing sides.
Your front shin does not need to be parallel with the front of the mat. Use a position appropriate for your mobility and avoid forcing the knee.
Supine Knee-to-Opposite-Side Glute Stretch
This variation combines hip movement with gentle trunk rotation.
How to Do a Supine Knee-to-Opposite-Side Glute Stretch
- Lie on your back.
- Bend one knee.
- Guide that leg gently across your body.
- Keep the movement controlled.
- Allow your torso to rotate only within a comfortable range.
- Hold the stretch.
- Return slowly.
- Repeat on the opposite side.
Final Thoughts
The Glute Stretch is a simple way to work on flexibility around the glutes and hips after lower-body training or as part of a dedicated mobility routine.
It can help develop or maintain:
- Glute flexibility
- Hip flexibility
- Comfortable hip movement
- Stretch tolerance
- Lower-body mobility
You do not need to force your knee downward or pull your leg as close to your chest as possible. The goal is simply to reach a comfortable position that produces a controlled stretch through the glutes.
Move gradually, breathe normally, and use a range appropriate for your current mobility. Consistent, comfortable stretching is more useful than trying to force a dramatic range in a single session. Learn more about Stretching Here.
Essential Gear for Glute Stretch
The Glute Stretch requires no specialized equipment, but a few simple items can make certain variations more comfortable or accessible.
- Exercise Mat: Provides a comfortable, non-slip surface for lying and floor-based Glute Stretches.
- Stretching Strap: Can provide extra reach if you struggle to comfortably hold your supporting leg during the Figure-Four Stretch.
- Yoga Block: Can provide support during floor-based variations such as the Pigeon Stretch when additional elevation makes the position more comfortable.
- Stable Chair or Bench: Useful for seated Figure-Four Stretches and as support during standing variations.
Glute Stretch FAQ
Q1: How long should I hold a Glute Stretch?
A practical starting point is approximately 15-30 seconds per side. The appropriate duration can vary depending on your flexibility goals, comfort, and overall stretching routine.
Q2: Why can’t I bring my leg very close to my chest?
Your current hip mobility, anatomy, and muscular flexibility can all affect your range. You do not need to pull your leg close to your chest; stop once you reach a comfortable glute stretch.
Q3: Should I push my knee down during a Glute Stretch?
Avoid aggressively pressing the knee downward. During a Figure-Four Stretch, you can usually adjust the intensity more safely by gradually drawing the supporting leg toward your torso while allowing the crossed hip to open comfortably.