
Learn how to do Australian Rows with proper form, avoid common mistakes, and discover the best Australian Row variations to build a stronger back, biceps, grip, and upper-body pulling strength.
Australian Rows, also known as Inverted Rows or Bodyweight Rows, are one of the best beginner-friendly pulling exercises in calisthenics. Instead of pulling your entire body vertically toward a Pull-Up bar, you position yourself underneath a lower bar and pull your chest toward it.
Whether you’re working toward your first Pull-Up, building a stronger back at home, or adding horizontal pulling to your calisthenics workouts, Australian Rows are an excellent exercise to master.
What Are Australian Rows?
Australian Rows are a horizontal bodyweight pulling exercise performed underneath a low horizontal bar, gymnastics rings, or another secure setup.
You grip the bar, extend your body underneath it, and pull your chest toward the bar while keeping your body rigid. You then lower yourself under control until your arms are extended again.
The exercise is commonly known by several names, including:
- Australian Rows
- Inverted Rows
- Bodyweight Rows
- Horizontal Rows
Australian Rows are commonly used in:
- Beginner calisthenics training
- Pull-Up progression programs
- Bodyweight workouts
- Back workouts
- Home workouts
- Upper-body strength training
The difficulty can easily be adjusted by changing your body angle or elevating your feet.
Benefits of Australian Rows
Australian Rows provide several strength and muscle-building benefits.
Benefits include:
- Builds back strength
- Strengthens the biceps
- Develops horizontal pulling strength
- Improves grip strength
- Strengthens the rear shoulders
- Develops scapular control
- Strengthens the core
- Helps prepare beginners for Pull-Ups
- Can be easily progressed or regressed
Australian Rows are particularly useful for beginners because you can adjust the amount of bodyweight being lifted simply by changing your body position.
Muscles Worked in Australian Rows
Australian Rows train several major pulling muscles throughout the back and arms.
Primary Muscles
- Latissimus Dorsi
- Rhomboids
- Trapezius
- Biceps Brachii
Secondary Muscles
- Rear Deltoids
- Brachialis
- Brachioradialis
- Forearms
- Core Muscles
Your glutes, abdominals, and other stabilizing muscles also work isometrically to maintain a rigid body position throughout the exercise.
How to Do Australian Rows (Step-by-Step)
Step 1: Set Up the Bar
Use a secure horizontal bar positioned around waist height or another height appropriate for your strength level.
Before starting:
- Make sure the bar is stable
- Ensure there is enough space underneath it
- Check that your feet will not slide
- Adjust the bar height if possible
A higher bar generally makes the exercise easier, while a lower bar makes it more difficult.
Step 2: Grip the Bar
Position yourself underneath the bar and grip it slightly wider than shoulder-width apart with your palms facing away from you.
Keep your hands firmly wrapped around the bar.
Your arms should be straight in the starting position.
Step 3: Establish Your Body Position
Extend your legs in front of you and place your heels on the floor.
Keep your:
- Head neutral
- Shoulders active
- Core engaged
- Glutes tight
- Legs straight
Your body should form a straight line from your head to your heels.
Tip: If straight-leg Australian Rows are too difficult, bend your knees and place your feet flat on the floor to reduce the difficulty.
Step 4: Initiate the Pull
Begin the movement by drawing your shoulder blades back and down.
Then bend your elbows and start pulling your chest toward the bar.
Avoid shrugging your shoulders toward your ears.
Step 5: Pull Your Chest Toward the Bar
Continue pulling until your chest approaches or lightly touches the bar.
At the top:
- Keep your core tight
- Squeeze your shoulder blades together
- Keep your hips from sagging
- Maintain a neutral neck
- Keep your elbows controlled
Avoid reaching your chin toward the bar to create the appearance of a greater range of motion.
Step 6: Lower Yourself Under Control
Slowly extend your elbows and lower your body back toward the starting position.
Continue until your arms are straight while keeping your shoulders controlled.
Do not allow your hips to collapse as you descend.
Pause briefly and repeat for the desired number of repetitions.
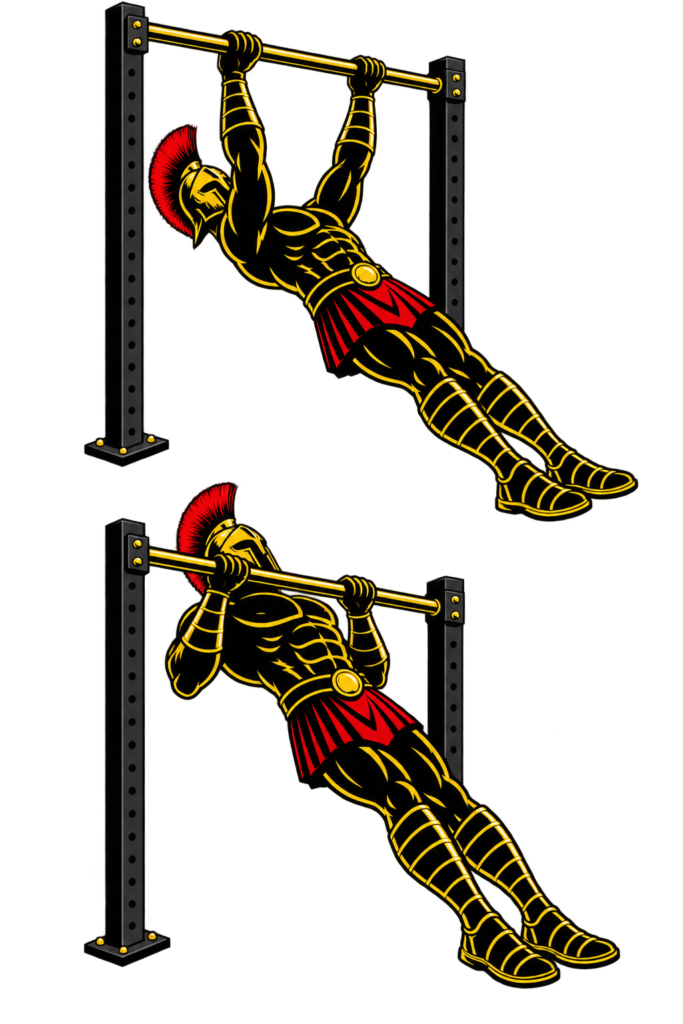
Australian Rows Form Checklist
Use this quick checklist to ensure proper Australian Row form.
- Use a stable horizontal bar
- Grip the bar firmly
- Keep your body straight
- Brace your core
- Squeeze your glutes
- Keep your shoulders active
- Pull your chest toward the bar
- Squeeze your shoulder blades together
- Avoid excessive swinging
- Lower yourself under control
- Fully extend your arms at the bottom
Think about moving your entire body as one rigid unit rather than pulling your upper body while allowing your hips to sag.
Common Australian Rows Mistakes
Letting the Hips Sag
Problem: Allowing your hips to drop breaks your straight body position and reduces core involvement.
Fix: Brace your abs, squeeze your glutes, and maintain a straight line from your shoulders to your heels.
Pulling With the Arms Only
Problem: Focusing entirely on bending your elbows can reduce involvement from the larger muscles of your back.
Fix: Initiate each repetition by controlling your shoulder blades, then drive your elbows backward as you pull.
Shrugging the Shoulders
Problem: Allowing your shoulders to rise toward your ears can reduce efficient scapular control.
Fix: Keep your shoulders controlled and avoid unnecessary shrugging during the pull.
Performing Partial Repetitions
Problem: Stopping well before your chest approaches the bar or failing to extend your arms at the bottom reduces your effective range of motion.
Fix: Use a body angle that allows you to perform controlled repetitions through a full, comfortable range.
Using Momentum
Problem: Swinging your hips or jerking your torso makes the exercise easier without developing the same level of controlled pulling strength.
Fix: Keep your entire body rigid and perform each repetition smoothly.
Flaring the Elbows Excessively
Problem: Allowing your elbows to flare far outward can alter the movement and reduce control.
Fix: Keep your elbows at a comfortable angle and drive them backward as you pull your chest toward the bar.
Setting the Exercise Too Difficult
Problem: Using an excessively low bar or horizontal body position before you’re strong enough can lead to poor form and incomplete repetitions.
Fix: Raise the bar or move your feet closer to your body to create a more upright angle. Gradually make your body more horizontal as your strength improves.
Australian Row Variations
Australian Rows can easily be modified for different strength levels.
Bent-Knee Australian Rows
An excellent beginner variation.
How to Do Bent-Knee Australian Rows
- Grip a stable horizontal bar.
- Bend your knees and place your feet flat on the floor.
- Keep your hips and torso controlled.
- Pull your chest toward the bar.
- Lower yourself slowly until your arms are straight.
The bent-knee position reduces the leverage and makes the movement easier.
Incline Australian Rows
Another beginner-friendly progression performed with a more upright body angle.
How to Do Incline Australian Rows
- Use a relatively high horizontal bar.
- Grip the bar and lean backward.
- Keep your body straight.
- Pull your chest toward the bar.
- Lower yourself under control.
Gradually use a lower bar as you become stronger.
Standard Australian Rows
The traditional bodyweight variation.
How to Do Standard Australian Rows
- Position yourself underneath a horizontal bar.
- Extend your legs with your heels on the floor.
- Keep your body rigid.
- Pull your chest toward the bar.
- Squeeze your shoulder blades together.
- Lower yourself until your arms are extended.
Feet-Elevated Australian Rows
A harder progression that increases the amount of bodyweight you must pull.
How to Do Feet-Elevated Australian Rows
- Place your heels on a stable elevated surface.
- Grip the horizontal bar.
- Keep your body straight.
- Pull your chest toward the bar.
- Lower yourself slowly to the starting position.
Keep the elevated surface secure throughout the exercise.
Ring Australian Rows
Gymnastics rings allow your hands and wrists to rotate naturally during the movement.
How to Do Ring Australian Rows
- Set the rings to an appropriate height.
- Grip one ring in each hand.
- Lean backward while keeping your body straight.
- Pull your chest toward the rings.
- Squeeze your back at the top.
- Lower yourself under control.
You can walk your feet forward or backward to adjust the difficulty.
Final Thoughts
Australian Rows are one of the most useful beginner pulling exercises in calisthenics and an excellent foundation for developing a stronger back and progressing toward Pull-Ups.
They develop:
- Back strength
- Biceps strength
- Grip strength
- Horizontal pulling power
- Scapular control
- Core stability
- Upper-body control
The exercise is also highly scalable. Beginners can start with a higher bar or bent knees, while stronger trainees can lower the bar, elevate their feet, or use more challenging variations.
Focus on keeping your body rigid, pulling your chest toward the bar, squeezing your back at the top, and controlling every descent.
Master your Australian Rows, progressively increase the difficulty, and build the pulling foundation needed for harder calisthenics exercises. Learn more about Pull Workouts here.
Essential Gear for Australian Rows
Australian Rows require a secure pulling surface, with several equipment options available depending on your training setup.
- Low Horizontal Bar: The standard equipment for Australian Rows, providing a stable surface for horizontal pulling.
- Gymnastics Rings: Allow you to perform Ring Australian Rows while naturally adjusting your hand position throughout the movement.
- Parallettes or Dip Bars: Tall, securely positioned bars can provide an alternative setup for Australian Rows when they offer sufficient clearance and stability.
- Weighted Vest: Allows advanced trainees to progressively add resistance once standard Australian Rows become easy.
Australian Row FAQ
Q1: Do Australian Rows help with Pull-Ups?
Yes. Australian Rows build back, arm, grip, and scapular strength that can support your progression toward Pull-Ups, although vertical pulling exercises and Pull-Up-specific progressions should also be included.
Q2: How many Australian Rows should beginners do?
Beginners can start with approximately 8-12 controlled repetitions for 2-4 sets. Adjust your body angle so you can complete each repetition with proper form.
Q3: Are Australian Rows the same as Inverted Rows?
Yes. Australian Rows and Inverted Rows generally refer to the same horizontal bodyweight pulling exercise, although the terminology used can vary between training communities.