
Resistance Band Face Pulls are an upper-body pulling exercise that primarily targets the rear shoulders and upper back while also involving muscles that control and externally rotate the shoulder.
The exercise requires only a resistance band and a secure anchor, making it useful for home workouts, resistance-band routines, and as an accessory exercise alongside Push-Ups, Pull-Ups, Rows, and pressing movements.
Proper technique is more important than using maximum resistance. With a controlled pull, suitable anchor height, and stable torso, Resistance Band Face Pulls can be an effective addition to balanced upper-body training.
What Are Resistance Band Face Pulls?
Resistance Band Face Pulls are performed by securing a resistance band around approximately face-to-upper-chest height, holding the band with both hands, and pulling it toward your face while your elbows travel outward.
Near the end of the movement, your hands separate toward either side of your face as your upper arms and shoulders move into external rotation.
Unlike a standard Resistance Band Row, where the elbows usually remain closer to the torso and the hands travel toward the ribs or abdomen, Face Pulls use a higher pulling path and place greater emphasis on the rear deltoids and upper-back muscles.
Resistance Band Face Pulls are commonly used in:
- Upper-body workouts
- Pull-day workouts
- Shoulder training
- Rear-delt training
- Resistance-band workouts
- Home workouts
- Strength-training programs
- Calisthenics accessory training
The resistance should be light enough that you can maintain controlled shoulder movement without leaning backward or turning the exercise into a Row.
Benefits of Resistance Band Face Pulls
Resistance Band Face Pulls provide several useful upper-body training benefits.
Benefits include:
- Strengthens the rear deltoids
- Trains the upper-back muscles
- Strengthens the shoulder external rotators
- Develops scapular control
- Trains the rhomboids and trapezius
- Complements pressing exercises
- Requires minimal equipment
- Allows resistance to be adjusted easily
- Works well in home-training programs
Face Pulls are particularly useful as an accessory exercise because they train several muscles around the rear shoulders and upper back that contribute to controlled shoulder movement.
Muscles Worked in Resistance Band Face Pulls
Resistance Band Face Pulls train several muscles around the shoulders and upper back.
Primary Muscles
- Posterior Deltoids
- Rhomboids
- Middle Trapezius
Secondary Muscles
- Lower Trapezius
- Infraspinatus
- Teres Minor
- Biceps Brachii
- Brachialis
- Forearms
The infraspinatus and teres minor are part of the rotator cuff and contribute to the external-rotation component of the exercise.
How to Do Resistance Band Face Pulls (Step-by-Step)
Step 1: Inspect Your Resistance Band
Before beginning, inspect the entire band and any attachments you plan to use.
Look for:
- Cracks
- Tears
- Fraying
- Damaged handles
- Weak attachment points
- Excessive wear
Do not use a visibly damaged resistance band.
Step 2: Secure the Resistance Band
Attach the middle of the resistance band to a stable anchor approximately at face-to-upper-chest height.
Make sure the anchor is suitable for resistance-band training and capable of handling force in the direction you will pull.
If you use a door anchor, install it according to the manufacturer’s instructions and make sure the door and anchor are secure before placing the band under significant tension.
Step 3: Establish Your Starting Position
Hold one end or handle of the band in each hand and step backward until the band has light tension with your arms extended.
Stand approximately hip- to shoulder-width apart with your knees slightly bent.
Keep your:
- Head neutral
- Chest naturally upright
- Core braced
- Spine neutral
- Shoulders controlled
- Wrists neutral
Do not stand so close to the anchor that the band hangs completely slack.
Step 4: Begin the Pull
Pull your hands toward your face while bending your elbows and allowing them to travel outward.
Keep your torso stable rather than leaning backward to overcome the resistance.
As you pull:
- Keep your shoulders controlled
- Draw your shoulder blades back
- Let your elbows travel outward
- Maintain a neutral head position
- Avoid shrugging toward your ears
Use a smooth, controlled motion.
Step 5: Pull Toward Your Face
Continue pulling until your hands approach either side of your face.
Allow your hands to separate as your elbows remain elevated and your shoulders externally rotate.
Near the end position:
- Keep your elbows bent
- Keep your shoulders away from your ears
- Bring your hands toward the sides of your face
- Keep your torso upright
- Maintain control of the band
Think about pulling the band apart as well as pulling it toward you.
Step 6: Reach the Contracted Position
Briefly pause in the end position and contract your rear shoulders and upper-back muscles.
Your forearms should move toward a more upright orientation rather than allowing your hands to collapse forward below your elbows.
Do not force your shoulders into an uncomfortable range simply to pull the band farther backward.
Step 7: Return Under Control
Slowly extend your arms and allow your shoulder blades to move naturally as you return toward the starting position.
Resist the band’s pull rather than allowing it to snap your arms forward.
Return to controlled arm extension while maintaining light band tension before beginning your next repetition.
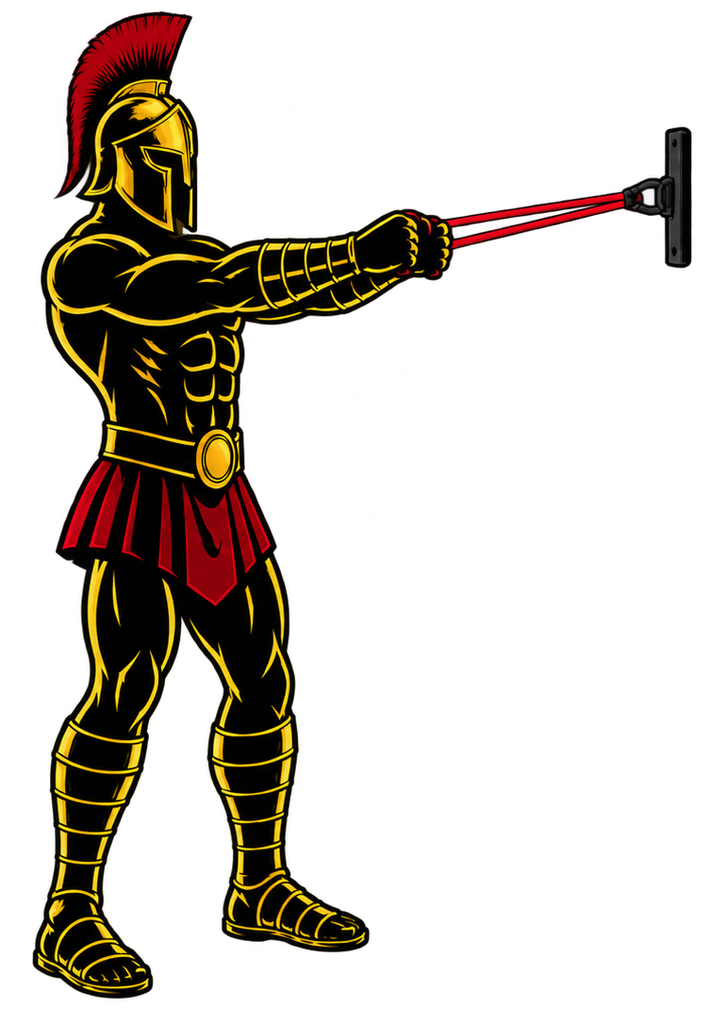
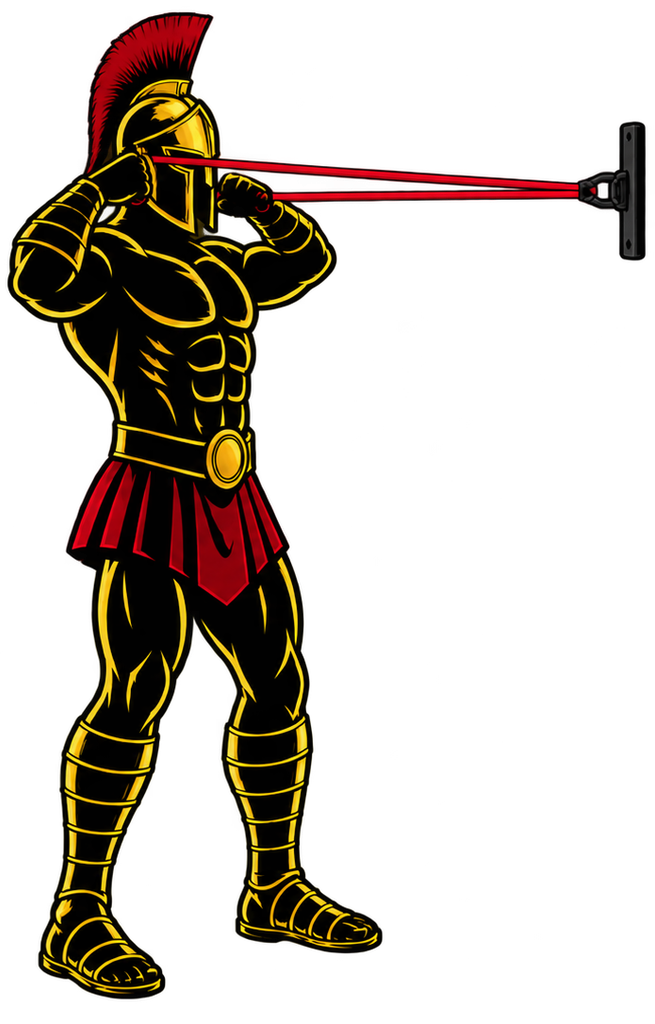
Resistance Band Face Pulls Form Checklist
Use this checklist to maintain proper Resistance Band Face Pull technique.
- Inspect your resistance band before training
- Use a secure anchor
- Position the anchor around face to upper-chest height
- Begin with light band tension
- Keep your feet stable
- Brace your core
- Maintain a neutral spine
- Keep your torso relatively still
- Pull toward your face
- Let your elbows travel outward
- Keep your shoulders away from your ears
- Separate your hands near your face
- Maintain controlled external rotation
- Contract your rear shoulders and upper back
- Control the return phase
- Never suddenly release a stretched band
The goal is controlled shoulder and upper-back movement, not moving the strongest band possible.
Common Resistance Band Face Pulls Mistakes
Using Too Much Resistance
Problem: An excessively strong band can cause you to lean backward, shorten the movement, shrug your shoulders, or turn the exercise into a Row.
Fix: Choose a lighter band that allows you to reach the end position with controlled technique.
Using an Unsafe Anchor
Problem: A weak or improperly installed anchor can come loose while the resistance band is stretched.
Fix: Use an anchor suitable for resistance-band training, inspect the setup before every set, and follow the manufacturer’s instructions for any anchoring equipment.
Pulling Toward the Chest
Problem: Pulling the band toward your lower chest or abdomen makes the movement more similar to a standard Resistance Band Row.
Fix: Use a higher pulling path and bring your hands toward the sides of your face.
Keeping the Hands Too Close Together
Problem: Simply pulling both hands straight toward your face can reduce the external-rotation component of the movement.
Fix: Allow your hands to separate toward either side of your face as you reach the contracted position.
Shrugging the Shoulders
Problem: Raising your shoulders toward your ears creates unnecessary upper-trapezius involvement and can interfere with controlled shoulder mechanics.
Fix: Keep your shoulders controlled and away from your ears throughout the exercise.
Leaning Backward
Problem: Using your bodyweight to lean away from the anchor creates momentum and makes it easier to move excessive resistance.
Fix: Brace your core and keep your torso relatively stationary. Reduce the resistance if necessary.
Letting the Band Snap Forward
Problem: Relaxing immediately after the pull allows the elastic resistance to rapidly pull your arms toward the anchor.
Fix: Control the return phase until your arms reach the starting position.
Resistance Band Face Pull Variations
Resistance Band Face Pulls can be modified according to your equipment, strength, and training goals.
Seated Resistance Band Face Pull
Sitting can make it easier to focus on upper-body movement without using the legs for assistance.
How to Do a Seated Resistance Band Face Pull
- Secure the band around face height while seated.
- Sit upright on a stable chair or bench.
- Hold one end in each hand.
- Brace your core.
- Pull your hands toward either side of your face.
- Keep your elbows outward.
- Return under control.
Half-Kneeling Resistance Band Face Pull
This variation provides a stable base while challenging your core to maintain torso position.
How to Do a Half-Kneeling Resistance Band Face Pull
- Secure the band around face height.
- Assume a half-kneeling position.
- Keep your torso upright.
- Brace your core.
- Pull the band toward your face.
- Separate your hands at the end of the movement.
- Return slowly.
Single-Arm Resistance Band Face Pull
Training one arm at a time adds a unilateral challenge and requires greater control against torso rotation.
How to Do a Single-Arm Resistance Band Face Pull
- Secure the band to a stable anchor.
- Hold the band in one hand.
- Step backward to create light tension.
- Brace your core.
- Pull your hand toward the side of your face.
- Allow controlled shoulder external rotation.
- Slowly return your arm.
- Repeat equally on both sides.
Resistance Band Face Pull With External Rotation
This variation emphasizes the rotational component at the end of the pull.
How to Do a Resistance Band Face Pull With External Rotation
- Secure the band around face height.
- Begin with your arms extended.
- Pull your elbows outward and backward.
- Bring your hands toward your face.
- Continue rotating your forearms toward a more upright position.
- Pause briefly under control.
- Reverse the movement slowly.
Use lighter resistance if necessary to maintain proper shoulder positioning.
Split-Stance Resistance Band Face Pull
A staggered stance can provide additional stability when band tension increases.
How to Do a Split-Stance Resistance Band Face Pull
- Secure the band to a stable anchor.
- Step backward and place one foot slightly behind the other.
- Brace your core.
- Keep your torso upright.
- Pull the band toward your face.
- Separate your hands near the end position.
- Return under control.
- Alternate your lead leg between sets if desired.
Final Thoughts
Resistance Band Face Pulls are a useful accessory exercise for training the rear shoulders, upper back, and muscles involved in controlled shoulder external rotation.
They develop:
- Rear-delt strength
- Upper-back strength
- Shoulder external-rotation strength
- Scapular control
- Upper-body muscular control
- Resistance-band proficiency
Face Pulls are not an exercise where maximum resistance should be the priority. A lighter band performed through a controlled range is generally more useful than a stronger band that forces you to lean backward, shrug, or shorten the movement.
Keep your torso stable, pull toward your face rather than your chest, separate your hands near the end position, and control the band throughout both directions of every repetition. Learn more about Pull Workouts here.
Essential Gear for Resistance Band Face Pulls
Resistance Band Face Pulls require minimal equipment, but the right setup makes the exercise easier to perform and progress.
- Resistance Bands: The essential equipment for the exercise. Multiple resistance levels allow you to choose an appropriate challenge and progressively increase resistance.
- Door Anchor: Provides an adjustable anchor point when a suitable fixed structure is unavailable. Install it according to the manufacturer’s instructions and confirm that the door and anchor are secure.
- Resistance Band Handles: Compatible handles can provide a comfortable grip, although many Face Pull variations can also be performed by safely gripping the band itself.
- Stable Anchor Point: A sturdy post, rack, or other suitable fixed structure can provide an alternative attachment point when it is designed or appropriate to withstand the direction of force.
Resistance Band Face Pulls FAQ
Q1: How many Resistance Band Face Pulls should beginners do?
Beginners can start with approximately 10-15 controlled repetitions for 2-3 sets using a light or moderate band. Prioritize movement quality over using heavy resistance.
Q2: Why do I feel Resistance Band Face Pulls mostly in my arms?
You may be using excessive resistance, pulling primarily with your hands, or failing to control your shoulder blades and upper arms. Try a lighter band and focus on driving your elbows outward and backward while contracting your rear shoulders and upper back.
Q3: Are Resistance Band Face Pulls the same as Resistance Band Rows?
No. Both are pulling exercises, but Rows generally use a lower pulling path with the elbows closer to the torso, while Face Pulls bring the hands toward the face with the elbows traveling outward and include more shoulder external rotation.