
Learn how to do Resistance Band Bicep Curls with proper form, avoid common mistakes, and discover useful variations for building stronger biceps with simple, portable equipment.
Resistance Band Bicep Curls recreate the fundamental curling motion using elastic resistance instead of dumbbells or a barbell. As the band stretches, resistance generally increases, making the upper portion of the curl progressively more demanding.
Whether you’re training at home, traveling, or adding resistance bands to your regular strength workouts, Band Bicep Curls provide a simple way to directly train your arms without requiring heavy weights.
What Are Resistance Band Bicep Curls?
Resistance Band Bicep Curls are an isolation-focused arm exercise performed by standing on or securely anchoring a resistance band and bending your elbows against the band’s tension.
The basic movement is similar to a traditional Bicep Curl:
- Begin with your arms extended
- Keep your upper arms relatively stationary
- Bend your elbows
- Curl your hands toward your shoulders
- Contract your biceps
- Lower your hands under control
Unlike free weights, resistance bands become progressively harder to stretch as they lengthen. This creates variable resistance throughout the movement.
Resistance Band Bicep Curls are commonly used in:
- Home workouts
- Resistance band training
- Pull-day workouts
- Arm workouts
- Calisthenics accessory training
- Travel workouts
- General strength training
Band thickness, length, and starting position can all affect how much resistance you experience.
Benefits of Resistance Band Bicep Curls
Resistance Band Bicep Curls provide several strength and muscle-building benefits.
Benefits include:
- Strengthens the biceps
- Builds elbow-flexion strength
- Trains the forearms
- Provides progressive band tension
- Allows easy resistance adjustments
- Requires minimal equipment
- Works well for home training
- Provides a portable Bicep Curl option
- Can complement Pull-Ups, Chin-Ups, and Rows
Because resistance bands are lightweight and portable, they provide a practical way to directly train the biceps almost anywhere.
Muscles Worked in Resistance Band Bicep Curls
Resistance Band Bicep Curls primarily train the elbow flexors while your forearms and upper body help stabilize the movement.
Primary Muscles
- Biceps Brachii
- Brachialis
Secondary Muscles
- Brachioradialis
- Forearm Flexors
- Forearm Stabilizers
Your core, shoulders, and upper back also contribute isometrically to maintaining a stable body position during standing curls.
How to Do Resistance Band Bicep Curls (Step-by-Step)
Step 1: Inspect Your Resistance Band
Before beginning, check your band for:
- Cracks
- Tears
- Fraying
- Damaged handles
- Weak attachment points
- Excessive wear
Do not train with a visibly damaged resistance band.
Step 2: Stand Securely on the Band
Place the middle of the resistance band underneath one or both feet, depending on the type of band and resistance you need.
Stand approximately hip-width apart.
Make sure the band is securely trapped underneath your feet and cannot unexpectedly slip free.
Hold one end or handle in each hand.
Step 3: Set Your Starting Position
Stand upright with your arms extended toward your sides.
Keep your:
- Head neutral
- Chest naturally upright
- Shoulders relaxed
- Core braced
- Elbows close to your sides
- Wrists neutral
There should ideally be some tension in the band at the bottom rather than a large amount of slack.
Step 4: Curl the Band Upward
Bend your elbows and curl your hands upward toward your shoulders.
Focus on moving primarily through your elbows.
As you curl:
- Keep your upper arms relatively stationary
- Keep your elbows near your torso
- Avoid swinging your body
- Maintain neutral wrists
- Keep your shoulders controlled
The resistance should increase as the band stretches.
Step 5: Reach the Top Position
Continue curling until you reach the top of your comfortable range.
Contract your biceps while keeping your elbows controlled.
Avoid moving your elbows dramatically forward simply to bring your hands higher.
Tip: Focus on shortening the biceps rather than trying to make your hands physically touch your shoulders.
Step 6: Lower the Band Under Control
Slowly extend your elbows and allow your hands to return toward the starting position.
Resist the band rather than allowing it to rapidly pull your arms downward.
Maintain:
- Stable torso
- Controlled elbows
- Neutral wrists
- Smooth movement
Step 7: Reset and Repeat
Return to the starting position with your arms extended while maintaining control of the band.
Reset your posture and perform the next repetition.
Never suddenly release a stretched resistance band.
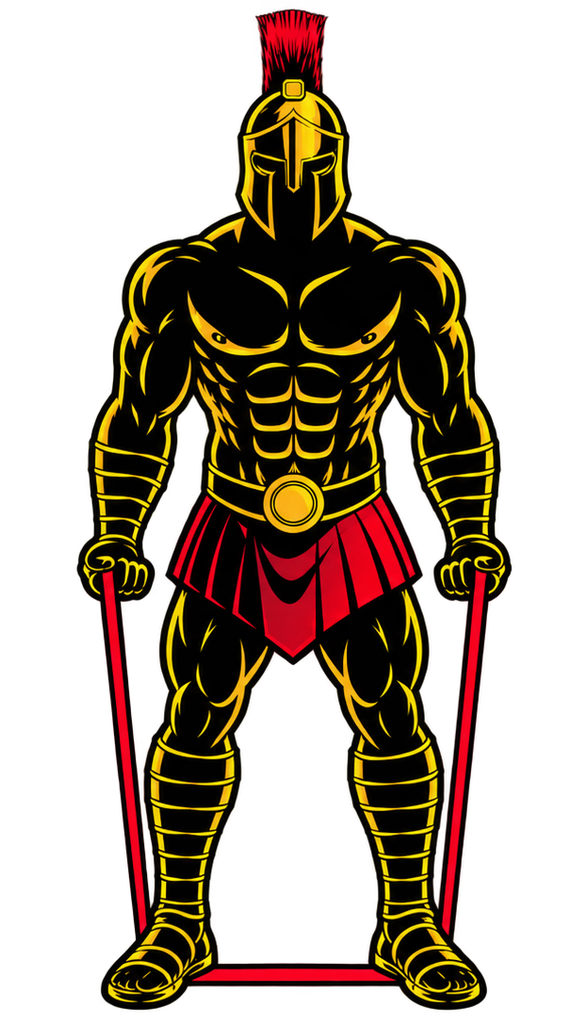
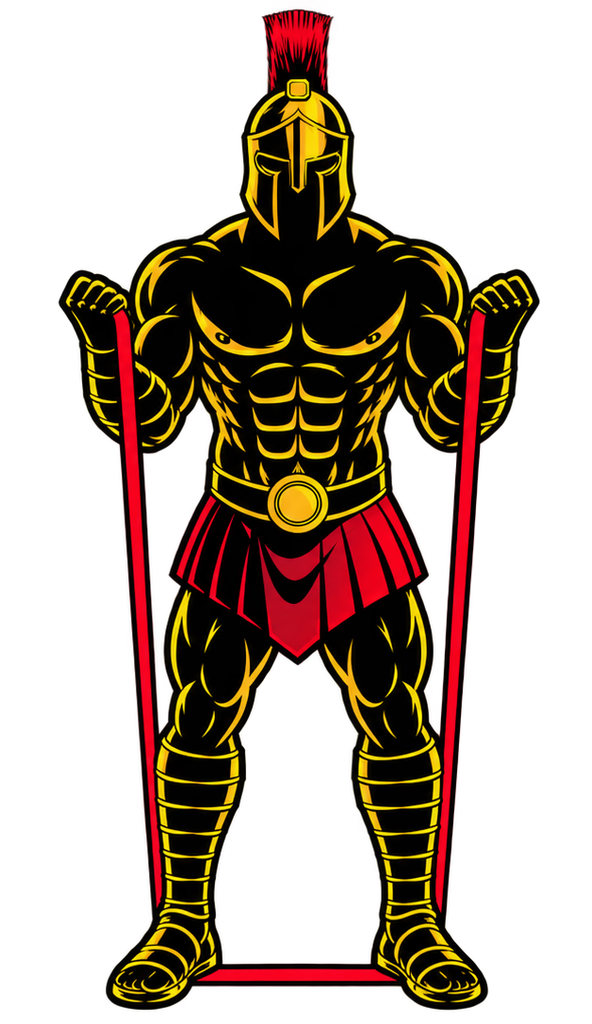
Resistance Band Bicep Curl Form Checklist
Use this quick checklist to ensure proper Resistance Band Bicep Curl form.
- Inspect the band before training
- Secure the band underneath your feet
- Stand upright
- Brace your core
- Keep your shoulders controlled
- Keep your elbows near your sides
- Maintain neutral wrists
- Curl primarily through elbow flexion
- Avoid swinging your torso
- Contract your biceps at the top
- Lower the band slowly
- Maintain tension throughout the movement
- Never suddenly release a stretched band
Controlled repetitions are more important than using the strongest resistance band you can handle.
Common Resistance Band Bicep Curl Mistakes
Using Too Much Resistance
Problem: An excessively strong band can cause you to swing your torso, move your elbows, shorten your range of motion, or lose control.
Fix: Choose a resistance that allows you to perform every repetition with controlled technique.
Using Too Little Tension
Problem: If the band is extremely loose at the starting position, the beginning of the curl may provide very little resistance.
Fix: Adjust your stance, shorten the usable band length, or use an appropriate band so there is useful tension through your intended range of motion.
Swinging the Torso
Problem: Leaning backward or using momentum turns the movement into a full-body motion rather than a controlled curl.
Fix: Brace your core, remain upright, and reduce the resistance if you cannot curl without swinging.
Moving the Elbows Forward
Problem: Allowing your elbows to travel substantially forward changes the movement and reduces the emphasis on strict elbow flexion.
Fix: Keep your upper arms relatively stationary and your elbows near your sides.
Bending the Wrists
Problem: Allowing your wrists to fold backward or forward creates unnecessary wrist movement.
Fix: Keep your wrists approximately neutral and aligned with your forearms.
Letting the Band Snap Down
Problem: Relaxing at the top and allowing the band to rapidly pull your hands downward removes control from the eccentric phase.
Fix: Actively resist the band as you lower your hands.
Standing on the Band Insecurely
Problem: If the band slips from beneath your feet while stretched, it can recoil unexpectedly.
Fix: Make sure the band is securely positioned beneath your feet before beginning every set and never use a damaged band.
Resistance Band Bicep Curl Variations
Resistance Band Bicep Curls can be modified to change your grip, body position, or training emphasis.
Single-Arm Resistance Band Bicep Curl
This variation allows you to train each arm independently.
How to Do a Single-Arm Resistance Band Bicep Curl
- Secure one end of the band beneath your foot.
- Hold the other end with one hand.
- Keep your elbow near your side.
- Curl your hand toward your shoulder.
- Contract your biceps.
- Lower under control.
- Complete both sides evenly.
Resistance Band Hammer Curl
A neutral grip increases the involvement of the brachialis and brachioradialis.
How to Do a Resistance Band Hammer Curl
- Stand securely on the resistance band.
- Hold the handles with your palms facing inward.
- Keep your elbows near your sides.
- Curl your hands upward.
- Maintain the neutral grip.
- Lower under control.
Seated Resistance Band Bicep Curl
Sitting can provide another stable position for performing Band Curls.
How to Do a Seated Resistance Band Bicep Curl
- Sit upright on a sturdy bench or chair.
- Secure the band underneath your feet.
- Hold the band in both hands.
- Keep your upper arms controlled.
- Curl your hands upward.
- Lower slowly to the starting position.
Resistance Band Concentration Curl
This variation trains one arm at a time with additional upper-arm support.
How to Do a Resistance Band Concentration Curl
- Sit on a stable chair or bench.
- Secure the band beneath one foot.
- Hold the band with the hand on the same side.
- Position your upper arm against the inside of your thigh.
- Curl your hand upward.
- Contract your biceps.
- Lower under control.
High-Tension Resistance Band Bicep Curl
A stronger band or shorter effective band length increases resistance for more advanced trainees.
How to Do a High-Tension Resistance Band Bicep Curl
- Choose an appropriate heavier resistance band.
- Secure it firmly beneath your feet.
- Maintain an upright posture.
- Curl without swinging your torso.
- Contract your biceps at the top.
- Control the band throughout the descent.
Only increase resistance when you can maintain strict form throughout your current variation.
Final Thoughts
Resistance Band Bicep Curls are a simple and effective way to directly train your biceps without requiring dumbbells, barbells, or gym machines.
They develop:
- Biceps strength
- Arm muscular development
- Elbow-flexion strength
- Forearm strength
- Muscular control
- Resistance-band proficiency
The key is treating the resistance band like real strength-training equipment rather than simply pulling it as quickly as possible.
Secure the band properly, keep your elbows controlled, curl without swinging, and resist the band throughout the lowering phase.
As you become stronger, progressively increase the resistance while keeping your technique strict. Learn more about Pull Workouts here.
Essential Gear for Resistance Band Bicep Curls
Resistance Band Bicep Curls require only basic equipment, although several band options can make your training more versatile.
- Resistance Bands: The essential equipment for the exercise. Using several resistance levels allows you to progressively increase difficulty as your biceps become stronger.
- Resistance Band Handles: Provide a comfortable and secure grip when using compatible tube-style resistance bands.
- Door Anchor: Allows compatible resistance bands to be anchored at different heights for additional Bicep Curl variations. Always use it according to the manufacturer’s instructions with a secure door and setup.
- Gym Gloves or Chalk: Optional for improving grip if sweaty hands make it difficult to securely hold your resistance band or handles.
Resistance Band Bicep Curl FAQ
Q1: Are Resistance Band Bicep Curls as effective as dumbbell curls?
Both can effectively train the biceps, but they provide different resistance profiles. Dumbbells provide resistance through gravity, while bands generally increase resistance as they stretch. Either can be useful when resistance and training volume are appropriately progressed.
Q2: How many Resistance Band Bicep Curls should beginners do?
Beginners can start with approximately 8-15 controlled repetitions for 2-3 sets using a band that allows proper technique. Increase the resistance progressively as those repetitions become comfortably manageable.
Q3: Should my elbows move during Resistance Band Bicep Curls?
Your elbows should remain relatively close to your sides during strict Band Bicep Curls. Small natural movement can occur, but avoid deliberately driving your elbows substantially forward to complete each repetition.