
Learn how to do Inchworms with proper form, avoid common mistakes, and discover useful variations for improving mobility, core stability, shoulder strength, and full-body coordination.
Inchworms are a dynamic bodyweight exercise that combines a standing forward fold, hand walkout, high plank, and return to standing. This combination makes them particularly useful during warm-ups because they move multiple joints while engaging both the upper and lower body.
They require no specialized equipment and can be performed almost anywhere with enough floor space.
What Are Inchworms?
Inchworms are a dynamic full-body exercise performed by bending forward from a standing position, placing your hands on the floor, walking them forward into a high plank, and then reversing the movement or walking your feet toward your hands.
The movement gets its name from the crawling motion of an inchworm.
Unlike a static stretch, Inchworms continuously move your body through several positions. They combine mobility with active muscular control, making them useful before many types of training.
Inchworms are commonly used in:
- Dynamic warm-ups
- Calisthenics training
- Full-body workouts
- Mobility routines
- Athletic conditioning
- Circuit training
- Home workouts
They can also be modified according to your hamstring mobility, core strength, and training experience.
Benefits of Inchworms
Inchworms provide several mobility, stability, and full-body training benefits.
Benefits include:
- Dynamically stretches the hamstrings
- Develops core stability
- Strengthens the shoulders
- Trains the arms
- Improves full-body coordination
- Moves the hips and shoulders through useful ranges of motion
- Reinforces the high-plank position
- Raises general activity before training
- Requires no specialized equipment
Because Inchworms combine movement and muscular engagement, they are particularly useful when you want a dynamic exercise rather than a prolonged static stretch before training.
Muscles Worked in Inchworms
Inchworms involve several muscle groups as you transition between standing, forward-fold, and plank positions.
Primary Muscles
- Core Muscles
- Anterior Deltoids
- Triceps
- Hamstrings
Secondary Muscles
- Pectoralis Major
- Serratus Anterior
- Glutes
- Quadriceps
- Calves
- Hip Flexors
- Forearms
The hamstrings are primarily lengthened during the forward-fold portions, while your shoulders, arms, and core work actively as your hands travel toward and away from the plank position.
How to Do Inchworms (Step-by-Step)
Step 1: Stand Upright
Begin standing with your feet approximately hip-width apart.
Keep your:
- Head neutral
- Shoulders relaxed
- Core lightly engaged
- Feet firmly planted
- Knees straight or softly bent
Make sure you have enough open floor space in front of you.
Step 2: Hinge Forward
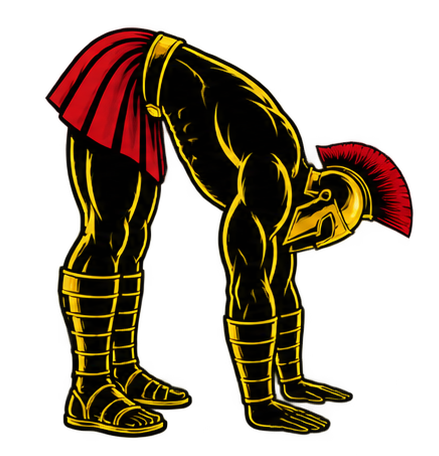
Push your hips backward and fold your torso toward the floor.
Reach your hands toward the ground in front of your feet.
Maintain control throughout the movement.
If your hamstring mobility prevents you from reaching the floor comfortably, bend your knees slightly rather than forcing the stretch.
Step 3: Place Your Hands on the Floor
Place both palms firmly on the floor in front of your feet.
Keep your:
- Fingers spread naturally
- Hands stable
- Shoulders controlled
- Knees softly bent if necessary
Shift enough weight toward your hands to begin walking them forward.
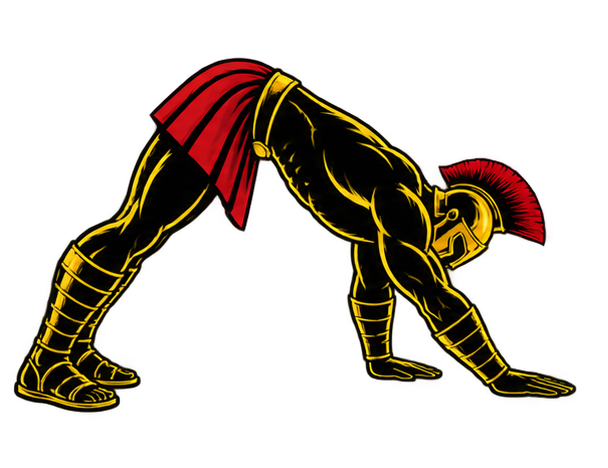
Step 4: Walk Your Hands Forward
Take small alternating steps with your hands while keeping your feet in place.
Continue walking your hands away from your feet as your body lengthens toward the floor.
Keep your movement controlled rather than rushing toward the plank.
Step 5: Reach a High Plank
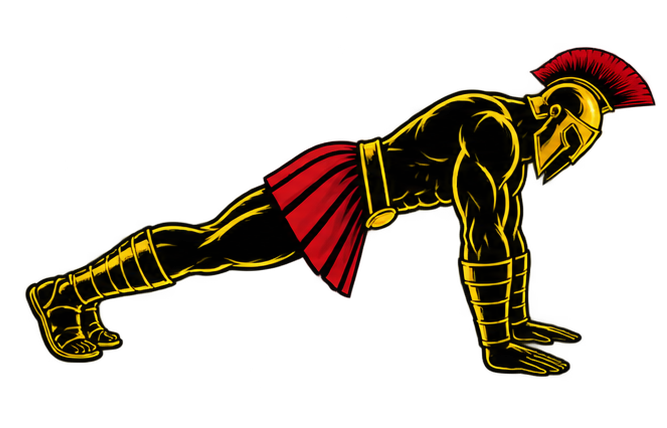
Continue until your body reaches a strong high-plank position.
Your hands should be approximately underneath your shoulders.
Keep your:
- Arms straight
- Core braced
- Glutes engaged
- Hips controlled
- Legs extended
- Head neutral
Your body should form approximately a straight line from your head to your heels.
Avoid walking your hands so far forward that your lower back begins to sag.
Step 6: Return Toward Your Feet
From the plank, walk your hands backward toward your feet using small controlled steps.
As your hands approach your feet, allow your hips to rise.
Keep your feet planted while returning to the forward-fold position.
Alternatively, some Inchworm variations keep the hands stationary and walk the feet toward the hands.
Step 7: Return to Standing
Once your hands are close to your feet, gradually lift your torso and return to an upright position.
Reset your posture before beginning the next repetition.
Perform each repetition smoothly rather than trying to complete the movement as quickly as possible.

Inchworms Form Checklist
Use this quick checklist to ensure proper Inchworm form.
- Start from a stable standing position
- Hinge forward under control
- Bend your knees slightly if necessary
- Place your palms firmly on the floor
- Walk your hands using small controlled steps
- Keep your shoulders stable
- Brace your core
- Reach a strong high plank
- Keep your hips from sagging
- Keep your head neutral
- Reverse the movement under control
- Breathe naturally
- Avoid rushing the exercise
Every repetition should move smoothly between the standing, fold, and plank positions.
Common Inchworms Mistakes
Forcing Straight Knees
Problem: Trying to keep your knees completely straight despite limited hamstring mobility can make it difficult to reach the floor comfortably and may cause you to compensate elsewhere.
Fix: Use a slight knee bend when necessary and gradually work on your mobility rather than forcing the position.
Letting the Hips Sag in the Plank
Problem: Allowing your hips to drop can cause your lower back to excessively extend and reduces your ability to maintain a strong plank.
Fix: Brace your core and squeeze your glutes as you reach the high-plank position.
Walking the Hands Too Far Forward
Problem: Continuing beyond a strong plank position increases the demand on your shoulders and core and may cause your torso to sag.
Fix: For the standard Inchworm, stop when you reach a controlled high plank with your hands approximately beneath your shoulders.
Rushing the Movement
Problem: Moving your hands quickly and carelessly reduces control and can make it difficult to maintain proper positions.
Fix: Use deliberate hand steps and maintain control throughout every phase.
Dropping Into the Forward Fold
Problem: Suddenly collapsing your torso toward the floor removes control from the movement.
Fix: Fold forward gradually and bend your knees slightly when your mobility requires it.
Shrugging the Shoulders
Problem: Allowing your shoulders to collapse toward your ears can create unnecessary upper-body tension during the hand walkout.
Fix: Maintain active, controlled shoulders while supporting your bodyweight.
Holding Your Breath
Problem: Holding your breath unnecessarily can make the movement feel more difficult and tense.
Fix: Breathe naturally throughout the entire repetition.
Inchworm Variations
Inchworms can be modified to change their difficulty or add additional exercises to the movement.
Short-Range Inchworm
A beginner-friendly variation that reduces the distance of the hand walkout.
How to Do a Short-Range Inchworm
- Stand upright.
- Fold forward and place your hands on the floor.
- Walk your hands forward a manageable distance.
- Stop before your form begins breaking down.
- Walk your hands back.
- Return to standing.
Gradually increase your range as your mobility and strength improve.
Inchworm to Push-Up
This variation adds an upper-body strength exercise at the end of each walkout.
How to Do an Inchworm to Push-Up
- Perform an Inchworm until you reach a high plank.
- Brace your core.
- Perform one controlled Push-Up.
- Return to the high plank.
- Walk your hands back toward your feet.
- Return to standing.
Inchworm With Feet Walk-In
Instead of walking your hands back, this variation moves your feet toward your hands.
How to Do an Inchworm With Feet Walk-In
- Fold forward and place your hands on the floor.
- Walk your hands forward into a high plank.
- Keep your hands planted.
- Take small steps forward with your feet.
- Raise your hips as your feet approach your hands.
- Repeat the sequence to travel forward.
Inchworm to Downward Dog
This variation adds an additional mobility position after reaching the plank.
How to Do an Inchworm to Downward Dog
- Walk your hands forward into a high plank.
- Push your hips upward and backward.
- Allow your torso to move toward your thighs.
- Hold briefly without forcing your heels toward the floor.
- Return to the high plank.
- Complete the Inchworm.
Inchworm to Shoulder Tap
This variation increases the core-stability demand.
How to Do an Inchworm to Shoulder Tap
- Walk your hands forward into a high plank.
- Brace your core and keep your hips level.
- Lift one hand and tap the opposite shoulder.
- Return your hand to the floor.
- Repeat with the opposite hand.
- Walk your hands back and return to standing.
Final Thoughts
Inchworms are a simple full-body exercise that combines dynamic mobility with active shoulder, arm, and core engagement.
They develop or improve:
- Dynamic hamstring mobility
- Core stability
- Shoulder strength
- Upper-body control
- Plank stability
- Full-body coordination
- Movement preparation
Their combination of mobility and muscular engagement makes them particularly useful in dynamic warm-ups before calisthenics, strength training, running, and other athletic activities.
Move through every stage under control, bend your knees when your mobility requires it, and focus on reaching a strong plank rather than walking your hands as far forward as possible. Learn more about Stretching Here.
Essential Gear for Inchworms
Inchworms require no equipment, but a few simple items can make the exercise more comfortable or provide additional progression options.
- Exercise Mat: Provides a comfortable, non-slip surface for your hands and feet during the walkout.
- Push-Up Handles: Can provide a more neutral wrist position for Inchworm variations when they are stable enough to be repositioned safely between movements.
- Weighted Vest: Can increase the difficulty for advanced trainees, although standard bodyweight Inchworms should be mastered first.
Inchworms FAQ
Q1: Are Inchworms a stretch or an exercise?
They can serve as both a dynamic mobility drill and a bodyweight exercise. The forward fold dynamically stretches the posterior legs, while the hand walkout and plank require active upper-body and core strength.
Q2: Should my legs stay completely straight during Inchworms?
Not necessarily. Keep your legs as straight as is comfortable, but use a slight knee bend if needed to reach the floor without forcing your hamstrings or compromising your movement.
Q3: How many Inchworms should beginners do?
Beginners can start with around 5-8 controlled repetitions. When using them as part of a warm-up, focus on movement quality rather than performing a large number of repetitions.