What Is a Warrior Body? The Ultimate Guide to Building Strength, Power, and Discipline

In a world obsessed with aesthetics, the idea of a “warrior body” stands apart. It’s not just about looking muscular—it’s about building a body that is strong, resilient, agile, and capable under pressure. A warrior’s body reflects discipline, endurance, and functional power—the kind of physique that performs just as well as it looks.

Whether your goal is to dominate physical challenges, prepare for military-level fitness, or simply become the strongest version of yourself, this guide will show you exactly what a warrior body is, why it matters, and how to build one.


What Is a Warrior Body?

A warrior body is a physique built for performance, durability, and real-world strength, not just appearance.

Key Characteristics of a Warrior Body

  • Functional Strength – Ability to lift, carry, push, and pull efficiently
  • Endurance – Stamina to sustain effort over long periods
  • Agility & Speed – Quick, explosive movement
  • Lean Muscle Mass – Muscular but not bulky; optimized for performance
  • Mental Toughness – Discipline, resilience, and the ability to push through discomfort

Unlike bodybuilding physiques, which prioritize size and symmetry, a warrior body is about capability over cosmetics.

A Warrior body achieved on the Path of a Warrior

Warrior Body vs Aesthetic Body

FeatureWarrior BodyAesthetic Body
FocusPerformance & functionAppearance & symmetry
Training StyleFunctional, athleticIsolation & hypertrophy
Body FatLow to moderateVery low
StrengthHigh, practicalModerate
EnduranceHighOften low

A warrior body doesn’t just look powerful—it is powerful.


Why You Should Build a Warrior Body

1. Real-World Strength

You’ll be able to handle physical challenges—lifting, running, climbing, and fighting fatigue.

2. Military-Level Fitness

If you’re preparing for elite forces or physically demanding careers, this is the ideal physique.

3. Injury Resistance

Stronger muscles, joints, and connective tissue reduce your risk of injury.

4. Mental Discipline

Training like a warrior builds grit, consistency, and self-control.

5. Balanced Physique

You won’t just look good—you’ll move better, feel stronger, and perform at your peak.


How to Build a Warrior Body

1. Train for Strength AND Endurance

A warrior trains for both power and stamina.

Focus on:

  • Push-ups, pull-ups, dips
  • Squats, lunges, deadlifts
  • Sprinting and long-distance running
  • Loaded carries (using backpack weights)

Goal: Be strong enough to lift your bodyweight and endure long physical effort.

2. Master Bodyweight Training

Bodyweight exercises are the foundation of a warrior physique.

Core movements:

  • Pull-ups
  • Push-ups
  • Planks
  • Burpees
  • Hanging leg raises

These develop relative strength, which is crucial for agility and control.

3. Build Explosive Power

A warrior must be fast and explosive.

Include:

  • Sprint intervals
  • Jump squats
  • Box jumps
  • Hill sprints

Goal: Develop speed and reaction ability.

4. Develop Endurance

Endurance separates average from elite.

Train with:

  • Long-distance running
  • Circuit training
  • High-intensity interval training (HIIT)

Goal: Perform under fatigue without breaking.

5. Follow a Warrior Diet

Fuel your body for performance, not just size.

Eat:

  • Lean proteins (chicken, eggs, lentils)
  • Complex carbs (rice, oats, potatoes)
  • Healthy fats (nuts, olive oil)
  • Plenty of water

Avoid:

  • Junk food
  • Excess sugar
  • Overeating

Rule: Eat to perform, not just to look good.

6. Train Your Mind

A warrior body is incomplete without a warrior mindset.

Develop:

  • Discipline (train even when you don’t feel like it)
  • Consistency (show up daily)
  • Resilience (push through discomfort)

Mental toughness is what turns training into transformation.


Sample Weekly Warrior Training Structure

Day 1: Strength + Core
Day 2: Running + Sprints
Day 3: Upper Body + Pull Focus
Day 4: HIIT + Conditioning
Day 5: Lower Body + Explosiveness
Day 6: Long Run / Endurance
Day 7: Rest or Active Recovery


Common Mistakes to Avoid

  • ❌ Training only for aesthetics
  • ❌ Ignoring endurance
  • ❌ Skipping recovery
  • ❌ Poor nutrition
  • ❌ Inconsistency

Final Thoughts

A warrior body is not built overnight. It is forged through discipline, struggle, and relentless effort. It’s not about looking like a warrior—it’s about becoming one.

If you commit to the process—training hard, eating right, and staying consistent—you won’t just transform your body. You’ll transform your mindset, your confidence, and your entire life. Learn more about The Mind and Body relation here.


Ready to Begin?

Start your journey today. Train like a warrior. Eat like a warrior. Think like a warrior.

Because warriors aren’t born—they’re built.

Best Resistance Bands for Calisthenics (2026) – Master Proper Form

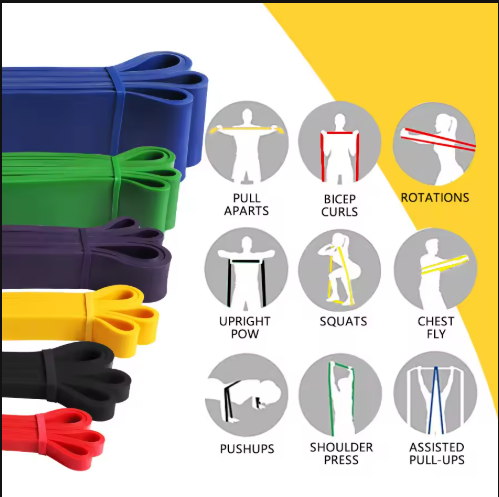
Resistance bands are one of the most useful pieces of equipment you can add to a calisthenics setup.

They can help you learn difficult exercises, improve your warm-up, add resistance to basic movements, strengthen weak points, and make bodyweight training more progressive.

But with so many resistance bands available, choosing the right one can be confusing.

That’s why we’ve selected two versatile options that can fit different training needs and budgets.

Whether you’re working toward your first pull-up, building stronger push-ups, improving your mobility, or simply making your home workouts more challenging, these are the best resistance bands for calisthenics, offering plenty of room to progress.


Quick Answer

If you want a versatile resistance band for calisthenics, both options featured in this guide are worth considering.

  • Product 1: Best for versatility, beginners, and people who want individual bands or multi-band bundles.
  • Product 2: Best for heavier resistance and users who want a long, wide single band for strength and assistance work.

The best choice ultimately depends on how much resistance you need and whether you want a single band or multiple resistance options.


Why Resistance Bands Are Essential for Calisthenics

Calisthenics is built around bodyweight movements, but that doesn’t mean you have to rely exclusively on your bodyweight.

Resistance bands give you another way to manipulate difficulty.

You can use them to:

  • Assist difficult exercises
  • Add resistance to easier exercises
  • Practice proper movement patterns
  • Improve warm-ups
  • Train mobility and flexibility
  • Strengthen muscles through different resistance levels
  • Progress toward advanced calisthenics skills
  • Train effectively at home
  • Add variety to your workouts

This makes resistance bands useful for both beginners and experienced athletes.

For example, a beginner might use a band to perform assisted pull-ups, while an advanced athlete could use one for resisted push-ups, mobility work, or skill training.

The key is choosing a band that matches your current strength and training goals.


Best Resistance Bands for Calisthenics

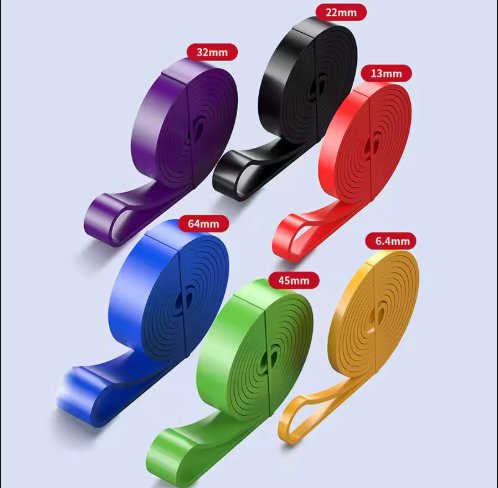
1. Heavy Duty Latex Resistance Band – Best Overall for Versatility

If you want one resistance band option that can cover a wide range of exercises, this heavy-duty latex resistance band is an excellent place to start.

It is designed as a long loop resistance band, making it useful for everything from assisted bodyweight exercises to warm-ups and strength training.

One of its biggest advantages is the variety of options available.

You can purchase an individual band or choose bundles containing multiple bands, allowing you to build a collection with different resistance levels.

Why This Works

The long-loop design makes this band particularly useful for calisthenics.

You can anchor it to a pull-up bar, use it around your legs, hold it with your hands, or incorporate it into mobility exercises.

That versatility means you aren’t limited to one exercise.

Key Features

  • Heavy-duty latex construction
  • Long loop design
  • Multiple resistance options
  • Individual bands available
  • 3-band and 4-band bundle options available
  • Suitable for strength training and calisthenics
  • Useful for assisted exercises
  • Portable and easy to store
  • Can be used for warm-ups and mobility work

Best For

  • Beginners
  • Calisthenics athletes
  • Assisted pull-ups
  • Resistance training
  • Warm-ups
  • Mobility exercises
  • Home workouts
  • Users who want multiple resistance levels

What We Like

The biggest advantage here is choice.

Instead of being locked into one resistance level, you can select the option that fits your current training level. The availability of multi-band bundles is particularly useful if you want several resistance levels without purchasing each band separately.

That also makes this a strong option for long-term progression.

As you become stronger, you can gradually move toward bands that provide less assistance or more resistance depending on the exercise.

Best Resistance Bands for Calisthenics(First)

2. Heavy Duty Resistance Band – Best for Heavy Resistance

If you want a substantial single resistance band for strength training and assisted calisthenics, this option deserves a look.

The band shown in the product listing measures 208 cm in length, variable mm in width, and 4 mm in thickness.

That long, wide design gives you plenty of material to work with during different exercises.

The listing also provides multiple resistance options, making it possible to select a band according to your training requirements.

Why This Works

This band is especially useful when you want a single heavy-duty band rather than purchasing a bundle.

It can be used for assisted pull-ups, resistance exercises, warm-ups, mobility drills, and other forms of strength training.

The wide construction also gives it a substantial feel during training.

Key Features

  • 208 cm length
  • Variable mm width
  • 4 mm thickness
  • Heavy-duty resistance design
  • Multiple resistance options
  • Long-loop construction
  • Suitable for calisthenics and strength training
  • Useful for pull-up assistance
  • Can be used for warm-ups and mobility
  • Available as an individual band

Best For

  • Intermediate athletes
  • Advanced beginners
  • Strength training
  • Assisted pull-ups
  • Full-body workouts
  • Home and gym training
  • Users who prefer a single heavy-duty band

What We Like

The biggest advantage of this band is its combination of length, width, and resistance options.

At 208 cm long, it provides plenty of working length for different movements and setups.

The individual-band format also makes it straightforward if you already know which resistance level you need and don’t want to purchase a bundle.

Best Resistance Bands for Calisthenics(Second)

Product Comparison

FeatureProduct 1Product 2
DesignLong-loop bandLong-loop band
MaterialLatexResistance latex
LengthLong-loop design208 cm
WidthVaries by optionVaries by option
Thickness6.4 mm shown for the pictured option4 mm
Resistance OptionsMultipleMultiple
Individual BandYesYes
Multi-Band Bundles3- and 4-band options availableNo
Assisted Pull-UpsYesYes
Strength TrainingYesYes
Warm-UpsYesYes
MobilityYesYes
Best ForVersatility and progressionHeavy-duty individual-band training

Which Resistance Band Should You Choose?

Choosing between these two is actually pretty simple.

Choose Product 1 If:

  • You want maximum versatility
  • You’re a beginner to calisthenics
  • You want several resistance levels
  • You want the option of buying a bundle
  • You plan to use bands for multiple types of training
  • You want to progressively change resistance as you get stronger

Choose Product 2 If:

  • You prefer purchasing one band
  • You want a long, wide resistance band
  • You already know the resistance level you need
  • You want a heavy-duty option for strength training
  • You primarily need a band for assistance and resistance exercises

Our overall pick for most calisthenics beginners: Product 1.

Its individual and multi-band options make it easier to build a resistance setup that grows with your training.


How to Choose the Right Resistance Level

One of the biggest mistakes beginners make is choosing a band simply because it has a high resistance rating.

Choose a resistance level that allows you to train with proper form while still making you work.

Your band should match the exercise.

For assisted exercises:

More resistance = more assistance.

For resisted exercises:

More resistance = greater training difficulty.

A beginner working toward their first pull-up may need considerably more assistance than someone who can already perform several clean repetitions.

As your strength improves, gradually change the resistance instead of immediately jumping to the hardest option.

⇛ The band is a tool—not a shortcut.


Final Verdict

⇛ Want maximum versatility?

Go for the Heavy Duty Latex Resistance Band.

The combination of multiple resistance options, individual and bundle configurations, and a wide range of possible exercises makes Product 1 our Best Overall choice.

It’s particularly useful if you’re building a calisthenics setup and want different resistance levels for progression.

⇛ Want a single heavy-duty band?

Go for the 208 cm Heavy Duty Resistance Band.

It’s a long, wide resistance band with multiple resistance options, making it a solid choice for pull-up assistance and strength training.


Final Words

You don’t need a gym to build serious calisthenics strength.

You don’t need a room full of equipment.

You need:

  • A resistance band that matches your strength
  • A basic training plan
  • Progressive overload
  • Proper form
  • Consistency

Use resistance bands to make difficult exercises easier.

Use them to make easy exercises harder.

Use them to build the strength you need for advanced calisthenics.

Start where you are.

Train consistently.

Then keep reducing assistance and increasing resistance as your body gets stronger.

Affiliate Disclosure: WarriorBodyAcademy may earn a commission when you purchase through affiliate links in this article, at no extra cost to you. We only recommend products that we believe are useful for our readers and training community.

Best Pull-Up Bars for Home Workouts (2026) – Build Real Strength Fast

If you’re serious about building a strong back, powerful arms, and real grip strength…

You need ONE thing:

A pull-up bar.

No gym.

No machines.

No excuses.

But here’s the problem:

Most beginners either:

  • Buy the wrong type of bar
  • Choose something that doesn’t fit their training space
  • Buy a weak doorway bar when they really want a permanent setup
  • Or overpay for features they don’t need

This guide fixes that.


Quick Answer (Don’t Overthink It)

⇛ Want the BEST overall setup?
Go for the Foldable Multi-Grip Wall-Mounted Pull-Up Bar

More grip positions and exercise options make it the more versatile choice for a serious home calisthenics setup.

⇛ Want something simple and strong?
Go for the Reinforced Wall-Mounted Pull-Up Bar

It’s a straightforward wall-mounted setup built around the exercises that matter most.


Why a Pull-Up Bar is Non-Negotiable

A pull-up bar can help you build:

  • Back strength
  • Biceps and forearms
  • Grip strength
  • Core strength
  • Shoulder stability
  • Body control

And it unlocks some of the most important exercises in calisthenics:

  • Pull-ups
  • Chin-ups
  • Dead hangs
  • Hanging knee raises
  • Hanging leg raises
  • Scapular pull-ups
  • Assisted pull-ups
  • Advanced pulling progressions

And the best part?

⇛ You can build serious pulling strength at home.


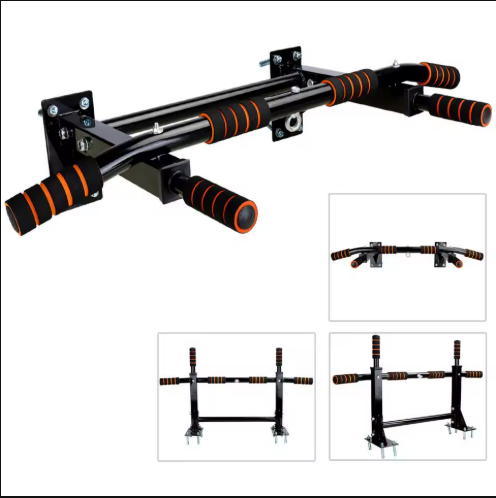
1. Foldable Multi-Grip Wall-Mounted Pull-Up Bar (Best Overall)

Key Features:

  • Wall-mounted steel construction
  • Multiple grip positions
  • Wide-grip handles
  • Neutral-grip handles
  • Padded gripping areas
  • Foldable/adjustable design
  • Multiple exercise possibilities
  • Designed for permanent home installation

Why This One Wins:

This isn’t just a straight bar attached to a wall.

⇛ It’s a more complete upper-body training station.

The biggest advantage is the variety of grip positions.

Instead of performing every pull-up with exactly the same hand position, you can incorporate different grips into your training.

That gives you options for:

  • Standard pull-ups
  • Wide-grip pull-ups
  • Neutral-grip pull-ups
  • Chin-up variations
  • Dead hangs
  • Hanging knee raises
  • Hanging leg raises
  • Scapular work
  • Core training

The additional handles also make this much more versatile than a basic straight pull-up bar.

And because the design is foldable, it can make more sense for a home training area where you don’t want the equipment permanently sticking far out from the wall.

Pros:

✓ Multiple grip positions
✓ More exercise variety
✓ Foldable design
✓ Wall-mounted setup
✓ Useful for both pulling and core exercises
✓ Better long-term versatility

Cons:

❌ Requires proper wall installation
❌ More complicated than a basic pull-up bar
❌ Requires enough wall and training space

Best Pull-Up Bars for Home Workouts(First)

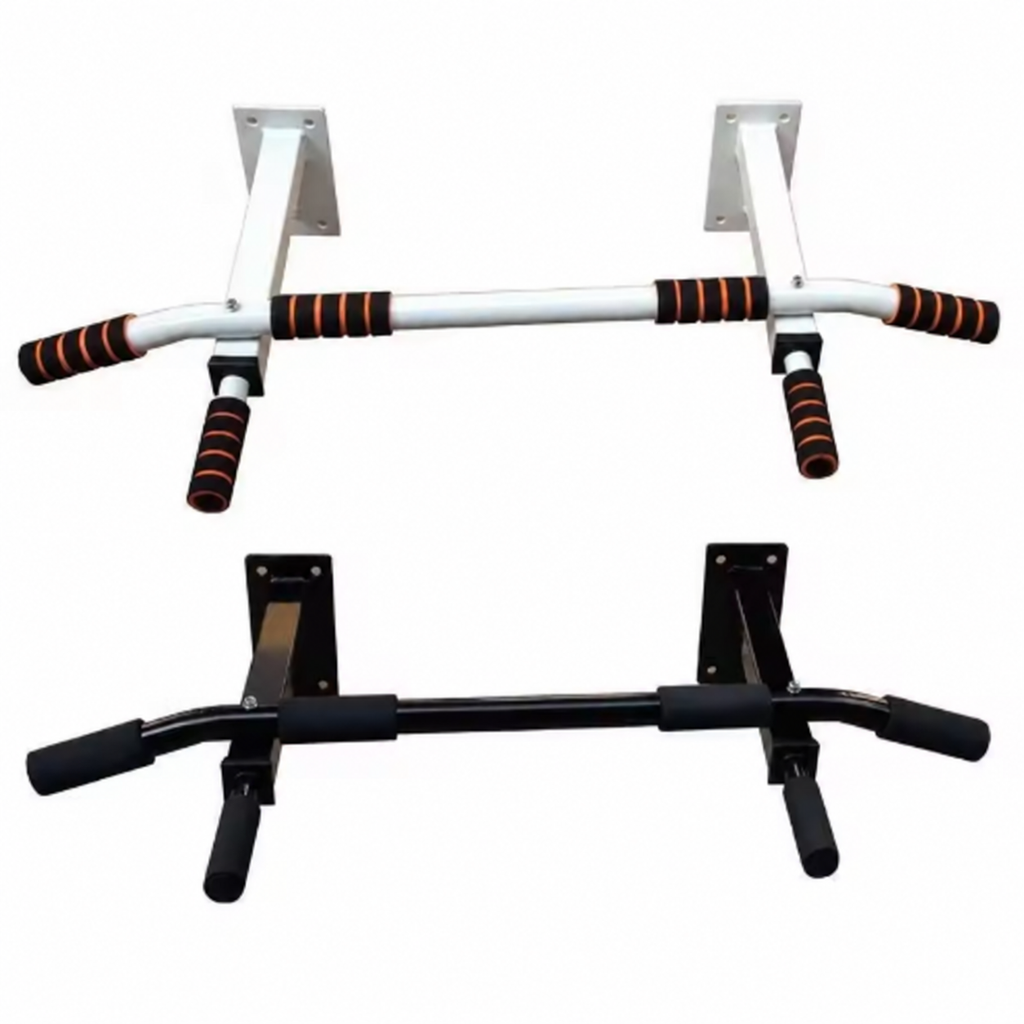
2. Reinforced Wall-Mounted Pull-Up Bar (Simple & Strong)

Key Features:

  • Reinforced steel construction
  • Wall-mounted design
  • Multiple grip positions
  • Padded handles
  • Approximately 94 cm wide on the larger configuration shown
  • Approximately 50 cm projection from the wall
  • 32 mm tubing shown on the larger configuration
  • Multiple versions available

Why Choose This:

If you want:

⇛ “Just give me a proper wall-mounted bar and let me train.”

This is it.

No need for a complicated training station.

Mount it securely, and you’ve got a permanent place for:

  • Pull-ups
  • Chin-ups
  • Dead hangs
  • Hanging knee raises
  • Hanging leg raises
  • Scapular pull-ups
  • Assisted pull-ups

The larger configuration shown also extends roughly 50 cm from the wall, giving your body more clearance than a bar mounted extremely close to the surface.

That matters during hanging exercises.

Pros:

✓ Simple wall-mounted design
✓ Multiple hand positions
✓ Reinforced construction
✓ Good wall clearance on the larger version
✓ Suitable for the essential pulling exercises
✓ Less complicated than Product 1

Cons:

❌ Requires permanent installation
❌ Less versatile than Product 1
❌ Different configurations have different dimensions and features

Best Pull-Up Bars for Home Workouts(Second)

Comparison – Choose Your Arsenal

FeatureFoldable Multi-Grip BarReinforced Wall-Mounted Bar
Wall-MountedYesYes
Multiple GripsYesYes
Foldable DesignYesNo
Exercise VarietyExcellentGood
SimplicityGoodExcellent
Best ForComplete home setupEssential pull-up training
Our PickBest OverallSimple & Strong

Beginner Plan

Listen carefully—this is where most people fail.

Even with the BEST pull-up bar, you won’t progress if you don’t train smart.

Start with:

⇛ Train 3–4 times/week

Start simple.

Build your grip, back, and arm strength.

Then gradually reduce assistance until you can perform clean pull-ups with your own bodyweight.


Important Buying Advice

Before you click:

Make sure your wall can actually support a wall-mounted pull-up bar.

A pull-up bar experiences more than just your static bodyweight.

You’re repeatedly hanging, pulling, lowering, and potentially swinging from it.

That’s why installation matters just as much as the bar itself.

Check Your Wall

A solid structural surface such as concrete or solid masonry is generally a much more appropriate mounting surface than weak or hollow material.

Do not assume every wall is suitable.

If Direct Mounting Isn’t Practical

If the pull-up bar’s mounting holes don’t line up with suitable fixing points on your wall, another option may be to install a strong wooden mounting frame or backer first, then attach the pull-up bar to that.

The wooden frame can provide a larger mounting surface and give you more flexibility when positioning the bar.

However, the frame itself must be securely anchored into a suitable structural wall or framing—not simply attached to weak plaster, hollow material, or another surface that cannot safely support your bodyweight and the forces created during training.

⇛ The wooden frame is only as strong as the structure holding it.

Check Your Space

You need enough room:

  • Below the bar for a full hang
  • In front of the wall for your body
  • Above the bar if you plan to progress toward muscle-ups or similar skills
  • Around the handles for different grip positions

Product 2’s larger configuration shown extends approximately 50 cm from the wall, so measure your available space before ordering.

Check the Exact Version

This is especially important with these listings.

Different configurations can have:

  • Different dimensions
  • Different handles
  • Different designs
  • Different prices

⇛ Don’t buy based only on the main product photo.

Check that the exact option selected in the listing is the one you actually want.

And remember:

⇛ The strongest-looking bar is useless if it isn’t installed correctly.


Final Verdict

⇛ Want maximum versatility?
Go for the Foldable Multi-Grip Wall-Mounted Pull-Up Bar.

The multiple grip positions, additional handles, foldable design, and greater exercise variety make Product 1 the stronger all-around option for a dedicated home calisthenics setup.

This is my Best Overall pick.

⇛ Want something simpler?
Go for the Reinforced Wall-Mounted Pull-Up Bar.

It gives you the essentials without turning your wall into an entire workout station.

Pull-ups.

Chin-ups.

Hangs.

Core work.

That’s enough to build serious strength.

But if both fit your budget and your wall?

I’d take Product 1.

The additional versatility gives you more room to progress.


Final Words

You don’t need a gym.

You don’t need fancy machines.

You need:

  • A pull-up bar
  • Proper technique
  • Progressive training
  • Consistency
  • Discipline

Start with hangs.

Build your first pull-up.

Build your reps.

Then keep progressing.

Install it properly.

Start training.

Affiliate Disclosure: WarriorBodyAcademy may earn a commission when you purchase through affiliate links in this article, at no extra cost to you. We only recommend products that we believe are useful for our readers and training community.

Fat-Loss Nutrition: How to Eat to Lose Fat and Gain Muscle

Losing fat does not require starving yourself, cutting out carbohydrates, skipping dinner, or surviving on salads.

Successful fat loss comes from creating a sustainable calorie deficit while still eating enough protein, nutrients, and training fuel to preserve muscle and maintain performance.

That distinction matters.

The goal should not simply be to make the number on the scale fall as quickly as possible. A good fat-loss diet should help you:

  • Lose body fat
  • Preserve as much muscle as possible
  • Keep training effectively
  • Control hunger
  • Maintain energy
  • Build habits you can actually sustain

This guide explains how calorie deficits work, how much protein to eat, which foods can make dieting easier, how quickly to lose weight, and how to adjust your nutrition when progress slows.

Quick Answer

To lose fat effectively:

  • Maintain a consistent calorie deficit.
  • Keep protein intake high.
  • Continue resistance training.
  • Eat enough carbohydrates to support performance.
  • Include healthy fats.
  • Base most of your diet around filling, nutrient-dense foods.
  • Track progress over several weeks rather than reacting to individual weigh-ins.
  • Adjust calories gradually if progress stalls genuinely.

You do not need to:

  • Eliminate carbohydrates
  • Stop eating at night
  • Train fasted
  • Avoid fruit
  • Eat six meals per day
  • Buy fat-burning supplements
  • Remove every food you enjoy

Fat loss is mostly about controlling total energy intake consistently enough for your body to use stored energy over time.


What Is Fat-Loss Nutrition?

Fat-loss nutrition is an eating strategy designed to reduce body fat while supporting muscle retention, health, recovery, and exercise performance.

The central requirement is a calorie deficit.

A calorie deficit simply means consuming fewer calories than your body uses over time. Your body then has to obtain some of the missing energy from stored energy, including body fat.

When your body requires more energy than your diet supplies, it must obtain additional energy from stored tissue.

However, simply eating as little as possible is not a good strategy.

An effective fat-loss diet also needs to provide:

  • Enough protein
  • Essential fats
  • Vitamins and minerals
  • Fiber
  • Adequate carbohydrates for training
  • Enough total food to remain sustainable

The goal is therefore not:

Eat as little as possible.

The goal is:

Eat enough to perform and recover while maintaining a consistent calorie deficit.

Why Fat-Loss Nutrition Matters

Exercise helps with fat loss, but nutrition usually determines whether you consistently maintain the energy deficit required for weight reduction.

Fat Loss

Reducing calorie intake below your average energy expenditure encourages your body to use stored energy.

Muscle Preservation

Dieting can result in some loss of lean tissue, particularly when the deficit is aggressive, or resistance training and protein intake are inadequate.

High protein intake and resistance training help reduce that risk.

Better Training Performance

An overly aggressive diet can leave you:

  • Weak
  • Tired
  • Irritable
  • Constantly hungry
  • Unable to maintain training intensity

A better-designed diet allows fat loss to occur while keeping your workouts productive.

Better Long-Term Results

The fastest possible diet is not necessarily the best diet.

If your plan is so restrictive that you abandon it after two weeks and regain the lost weight, it has not solved the problem.

Consistency matters more than suffering.


The Most Important Principle: You Need a Calorie Deficit

No specific food burns enough fat to override energy balance.

You can eat:

  • Low-carb
  • High-carb
  • Mediterranean-style
  • Plant-based
  • High-protein
  • Three meals per day
  • Five meals per day

and lose fat if the diet consistently creates an appropriate calorie deficit.

Likewise, even a diet consisting entirely of nutritious foods can cause weight gain if calorie intake consistently exceeds energy expenditure.

Foods matter enormously for health, hunger, performance, and adherence.

But calories still matter for fat loss.


How Many Calories Should You Eat for Fat Loss?

Your first step is estimating your maintenance calories.

Maintenance calories are approximately how much energy you need each day to maintain your current bodyweight.

Your needs depend on:

  • Bodyweight
  • Height
  • Age
  • Sex
  • Muscle mass
  • Daily activity
  • Training
  • Occupation
  • Individual metabolism

Online calorie calculators can provide a starting estimate, but the real test is what happens to your bodyweight over several weeks.

Start With a Moderate Deficit

A useful starting approach for many people is approximately:

10–20% below estimated maintenance calories

For example, if maintenance is approximately:

2,500 calories

A 15% deficit would be:

2,500 × 0.15 = 375 calories

2,500 − 375 = 2,125 calories per day

You could therefore begin around 2,100–2,150 calories and monitor your progress.

This is an estimate, not a law.

Your actual results tell you whether the intake is appropriate.

Do You Need a 500-Calorie Deficit?

No.

The common “500 calories per day” rule can work for some people, but it should not be treated as mandatory.

A smaller person may find a 500-calorie deficit very aggressive.

A much larger person may tolerate it easily.

Percentage-based adjustments are often more useful because they account better for differences in body size and energy requirements.


How Fast Should You Lose Weight?

Faster is not always better.

A reasonable general target is often around:

0.5–1% of bodyweight per week

For an 80 kg person:

  • 0.5% = 0.4 kg per week
  • 1% = 0.8 kg per week

Someone already quite lean may benefit from losing weight toward the slower end.

Someone carrying substantially more body fat may be able to lose somewhat faster while still maintaining good performance and muscle retention.

The goal is not to chase the largest possible weekly drop.

You want a rate you can maintain without destroying your training and hunger control.


Protein: Your Most Important Macronutrient During Fat Loss

A macronutrient is a nutrient your body needs in relatively large amounts and that contributes calories to your diet. Protein becomes especially important during a calorie deficit.

Adequate protein can help:

  • Preserve lean mass
  • Support recovery
  • Increase fullness
  • Support muscle protein synthesis
  • Make dieting easier

For most people performing regular resistance training, a practical daily range is approximately:

1.6–2.2 grams of protein per kilogram of bodyweight

For an 80 kg person:

80 × 1.6 = 128 g

80 × 2.2 = 176 g

That gives a practical range of roughly:

128–176 grams of protein per day

People dieting aggressively or already relatively lean may prefer the upper end of an appropriate protein range.

Good Protein Sources for Fat Loss

Choose protein sources that fit your calorie budget.

Examples include:

  • Chicken breast
  • Turkey
  • Lean beef
  • Fish
  • Eggs
  • Egg whites
  • Greek yogurt
  • Cottage cheese
  • Low-fat milk
  • Tuna
  • Lentils
  • Beans
  • Chickpeas
  • Tofu
  • Tempeh
  • Whey protein
  • Plant-protein powder

You do not need to live on chicken breast.

Variety makes a diet easier to sustain.


Carbohydrates: Keep Your Training Fuel

Carbohydrates are often the first nutrient people eliminate when attempting to lose fat.

That is unnecessary.

Carbohydrates can support:

  • Resistance training
  • Calisthenics
  • Running
  • Combat sports
  • Sprinting
  • High-intensity conditioning

The goal during fat loss is not to remove carbohydrates.

The goal is to control your overall calorie intake.

Good Carbohydrate Sources

  • Rice
  • Potatoes
  • Oats
  • Whole-grain bread
  • Pasta
  • Fruit
  • Beans
  • Lentils
  • Quinoa
  • Cereal
  • Sweet potatoes

Higher-fiber carbohydrate sources can be particularly useful because they may increase fullness.

However, foods such as white rice or bread can still fit perfectly well into a fat-loss diet.

Portion size matters more than labeling foods “good” or “bad.”

Portion size simply means the amount of a food you eat at one time. Portion control means managing those amounts so that your total calorie intake remains appropriate for your goal.

Should You Eat Carbs Only Around Workouts?

No.

Eating carbohydrates around training can be useful because it provides fuel when you need it most.

But carbohydrates can also be eaten:

  • At breakfast
  • At lunch
  • At dinner
  • On rest days

Your body does not require all carbohydrates to be confined to a tiny workout window.

Use meal timing according to:

  • Hunger
  • Training schedule
  • Preferences
  • Lifestyle
  • Total calorie target

Dietary Fat During Fat Loss

Fat is calorie-dense, providing approximately:

9 calories per gram

compared with roughly:

4 calories per gram for protein and carbohydrate.

That means portions can become large calorie sources quickly.

For example, foods such as:

  • Oils
  • Nut butter
  • Nuts
  • Seeds
  • Avocado
  • Cheese

can be nutritious but easy to overeat.

That does not mean dietary fat is bad.

Fat is necessary for:

  • Cell function
  • Hormone production
  • Absorption of fat-soluble vitamins
  • Overall health

The goal is simply moderation.

Good Fat Sources

  • Olive oil
  • Nuts
  • Seeds
  • Avocado
  • Egg yolks
  • Fatty fish
  • Nut butter

Measure calorie-dense foods if portion control is difficult.

A tablespoon of oil matters even if it is “healthy.”


Vegetables and Fruit: Your Fat-Loss Allies

Fruit and vegetables are useful during fat loss because many provide:

  • High food volume
  • Fiber
  • Water
  • Vitamins
  • Minerals
  • Relatively few calories

Useful options include:

  • Apples
  • Berries
  • Oranges
  • Bananas
  • Melons
  • Leafy greens
  • Carrots
  • Tomatoes
  • Cucumbers
  • Broccoli
  • Cauliflower
  • Peppers

You do not need to avoid fruit because it contains sugar.

Whole fruit is generally much harder to overconsume than sugary drinks or highly processed snacks.


Fiber and Fullness

Fiber can make a calorie deficit easier by increasing fullness and slowing digestion.

Good sources include:

  • Vegetables
  • Fruit
  • Oats
  • Whole grains
  • Beans
  • Lentils
  • Chickpeas
  • Seeds

Increase fiber gradually if your current diet contains very little, because suddenly consuming huge amounts can cause digestive discomfort.


The Best Foods for Fat Loss

There are no magical fat-burning foods.

But some foods make maintaining a calorie deficit easier.

Look for foods that provide high:

Satiety per calorie

Useful options include:

Lean Protein

  • Chicken
  • Fish
  • Lean meat
  • Greek yogurt
  • Cottage cheese
  • Eggs
  • Tofu

High-Volume Foods

  • Vegetables
  • Soups
  • Salads
  • Fruit
  • Potatoes

Fiber-Rich Foods

  • Oats
  • Beans
  • Lentils
  • Whole grains
  • Fruit
  • Vegetables

Lower-Calorie Drinks

  • Water
  • Sparkling water
  • Unsweetened tea
  • Coffee without large amounts of sugar or cream

You do not need to completely eliminate higher-calorie foods.

Simply understand that they provide less food volume for the same number of calories.


How to Structure Your Meals

There is no scientifically perfect 40/30/30 plate.

Instead, build meals around a simple structure.

Start With Protein

Choose:

  • Chicken
  • Fish
  • Eggs
  • Lean beef
  • Greek yogurt
  • Cottage cheese
  • Lentils
  • Tofu

Add Vegetables or Fruit

This increases food volume and micronutrient intake.

Add Carbohydrates

Choose a portion appropriate for your calorie needs and training.

Examples:

  • Rice
  • Potatoes
  • Oats
  • Bread
  • Pasta
  • Fruit

Add Fat as Needed

Examples:

  • Olive oil
  • Nuts
  • Seeds
  • Avocado

Because fats are calorie-dense, portion awareness is useful.


How Many Meals Should You Eat?

There is no mandatory meal frequency for fat loss.

You could lose fat eating:

  • 2 meals
  • 3 meals
  • 4 meals
  • 5 smaller meals

What matters most is whether your eating pattern helps you:

  • Control hunger
  • Reach your protein target
  • Maintain your calorie deficit
  • Train effectively
  • Stay consistent

For many people, 3–4 meals per day works well, but it is not a requirement.

Choose the schedule you can maintain.


When Should You Eat While Losing Fat?

Meal timing has much less influence on fat loss than total calorie intake.

However, timing can affect:

  • Hunger
  • Training performance
  • Recovery
  • Convenience

Before Training

A protein-and-carbohydrate meal can support performance.

Examples:

  • Chicken + rice
  • Eggs + toast + fruit
  • Greek yogurt + oats
  • Banana + whey protein

After Training

Eat a normal protein-rich meal when practical.

Examples:

  • Chicken + potatoes
  • Fish + rice
  • Eggs + toast
  • Greek yogurt + fruit

You do not need an emergency meal within exactly 30 minutes.

At Night

You are allowed to eat carbohydrates at night.

Rice does not gain special fat-storing powers after sunset.

Fat gain depends primarily on long-term energy balance.

If a carbohydrate-containing dinner:

  • Fits your calories
  • Helps recovery
  • Keeps you satisfied
  • Prevents late-night snacking

then it may actually make your diet easier to follow.


Hydration During Fat Loss

Drinking water is important for health and performance, but dehydration does not magically “stop fat loss.”

Likewise, everyone does not need exactly 3–4 liters per day.

Fluid needs vary according to:

  • Body size
  • Climate
  • Sweat rate
  • Diet
  • Activity
  • Training duration

Drink regularly throughout the day and increase intake when:

  • Training hard
  • Sweating heavily
  • Exercising in hot conditions

Water can also help replace calorie-containing drinks when reducing calorie intake.

Liquid Calories: An Easy Place to Overeat

Beverages can contribute substantial calories without providing much fullness.

Common examples include:

  • Soft drinks
  • Sweetened coffee
  • Sweetened tea
  • Milkshakes
  • Energy drinks
  • Fruit juice
  • Alcohol

You do not necessarily need to eliminate every calorie-containing drink.

But if fat loss is difficult, drinks are often one of the easiest places to reduce calories without reducing the amount of solid food you eat.


Practical Fat-Loss Meal Ideas

Portions should be adjusted according to your individual calorie requirements.

Breakfast Option 1

  • Eggs
  • Whole-grain toast
  • Fruit
  • Coffee or tea

Breakfast Option 2

  • Greek yogurt
  • Oats
  • Berries or banana
  • Small amount of nuts

Lunch Option 1

  • Grilled chicken
  • Rice
  • Large serving of vegetables

Lunch Option 2

  • Tuna or chicken sandwich
  • Salad
  • Fruit

Snack Option 1

  • Greek yogurt
  • Fruit

Snack Option 2

  • Protein shake
  • Banana

Dinner Option 1

  • Fish
  • Potatoes
  • Vegetables

Dinner Option 2

  • Lean beef
  • Rice
  • Salad or vegetables

Plant-Based Option

  • Lentils or beans
  • Rice or quinoa
  • Vegetables
  • Tofu or another protein source if needed

Example Fat-Loss Day

This is an example meal structure, not a universal diet plan.

Breakfast

  • 3 eggs
  • 2 slices whole-grain toast
  • Fruit

Lunch

  • Grilled chicken
  • Rice
  • Large vegetable serving

Pre-Workout Snack

  • Greek yogurt
  • Banana

Dinner

  • Fish or lean beef
  • Potatoes
  • Vegetables

Optional Snack

  • Cottage cheese
  • Greek yogurt
  • Fruit
  • Protein shake

Adjust portions according to your required calorie intake.


Strength Training While Losing Fat

Resistance training is one of the most important tools for preserving muscle during a cut.

Continue training movements such as:

  • Squats
  • Pull-ups
  • Rows
  • Push-ups
  • Dips
  • Presses
  • Deadlift variations
  • Weighted calisthenics

Your goal during fat loss should generally be to maintain as much strength and training performance as reasonably possible.

You do not need to turn every workout into endless cardio simply because you are cutting.

Cardio for Fat Loss

Cardio can help increase energy expenditure and improve cardiovascular fitness.

Useful options include:

  • Walking
  • Running
  • Cycling
  • Swimming
  • Jump rope
  • Conditioning circuits

However, cardio does not replace control over calorie intake.

It is often easier to avoid eating 400 unnecessary calories than to repeatedly perform enough exercise to burn them.

A combination of:

Diet + resistance training + appropriate activity

is usually more practical.

Steps and Daily Activity

Fat loss is influenced by more than formal workouts.

Daily movement contributes to total energy expenditure.

This includes:

  • Walking
  • Taking stairs
  • Chores
  • Standing
  • Moving during work
  • General physical activity

Keeping daily activity relatively consistent can make progress easier to interpret.

If you unknowingly start moving much less because your diet leaves you exhausted, your calorie expenditure may decrease.


How to Track Fat-Loss Progress

Do not judge progress using one weigh-in.

Bodyweight changes daily because of:

  • Water
  • Sodium
  • Carbohydrates
  • Food volume
  • Bowel movements
  • Training inflammation

Instead, weigh yourself under similar conditions and track the weekly average.

For example:

Monday: 80.3 kg
Tuesday: 80.0 kg
Wednesday: 80.5 kg
Thursday: 79.8 kg
Friday: 80.0 kg
Saturday: 79.7 kg
Sunday: 79.9 kg

The average provides a much more useful picture than any individual number.

You can also track:

  • Waist measurement
  • Progress photos
  • Clothing fit
  • Training performance

What to Do When Fat Loss Stalls

First, do not panic.

One week without weight loss does not necessarily mean your diet stopped working.

Water retention can hide fat loss temporarily.

Before changing anything, ask:

  • Have I followed the diet consistently?
  • Have portion sizes increased?
  • Am I tracking oils, sauces, snacks, and drinks?
  • Has my daily activity decreased?
  • Has my bodyweight average genuinely stalled for several weeks?

If progress has truly stopped, make a small adjustment.

For example:

  • Reduce daily intake by around 100–200 calories.

or:

  • Increase daily activity slightly.

Do not instantly remove another 1,000 calories.

Small changes are easier to evaluate and sustain.


Do You Need Cheat Meals?

No.

You do not need a scheduled cheat meal to “boost metabolism.”

However, you can include foods you enjoy within your overall calorie intake.

Instead of viewing foods as:

Clean vs cheating

think in terms of:

Overall dietary quality and calorie control.

A burger once in a while does not ruin a good diet.

A weekly 4,000-calorie binge disguised as a “cheat meal” can make your calorie deficit considerably harder to maintain.


Do You Need Diet Breaks?

Sometimes.

Someone dieting for a long period may benefit psychologically from spending some time eating approximately at maintenance calories.

A diet break is not magic.

It does not reset your metabolism overnight.

But it can provide:

  • Relief from constant restriction
  • More training fuel
  • Better adherence
  • A mental break

Whether you need one depends on the length and difficulty of your diet.


Supplements for Fat Loss

Supplements should never be the foundation of a fat-loss strategy.

Protein Powder

Useful if it helps you meet your protein target.

It does not burn fat directly.

Caffeine

Caffeine can improve alertness and training performance and may slightly affect energy expenditure.

However, it should not be treated as a substitute for a calorie deficit.

Creatine

Creatine does not directly burn fat, but it can support resistance-training performance and muscle retention.

Some people gain a small amount of water weight inside their muscles after starting creatine.

That is not body-fat gain.

Fiber Supplements

These can be useful for people struggling to consume enough dietary fiber, although obtaining fiber from whole foods is usually preferable when practical.

Fat Burners

Most commercial fat burners offer far less benefit than their marketing suggests.

Some primarily rely on stimulants such as caffeine.

You do not need a fat burner to lose fat.


Common Fat-Loss Mistakes and Myths

Mistake 1: Cutting Calories Too Aggressively

More restriction does not automatically produce better results.

Extreme deficits can increase:

  • Hunger
  • Fatigue
  • Training decline
  • Muscle loss risk
  • Diet abandonment

Mistake 2: Not Eating Enough Protein

Protein is one of your best tools for preserving muscle during a cut.

Mistake 3: Removing All Carbohydrates

Carbohydrates can support training performance.

You can lose fat while eating rice, bread, potatoes, oats, pasta, and fruit.

Mistake 4: Avoiding Carbs at Night

Fat loss does not stop because you ate carbohydrates at dinner.

Total energy balance matters far more.

Mistake 5: Drinking Large Numbers of Calories

Liquid calories can accumulate quickly and may provide less fullness than solid foods.

Mistake 6: Assuming Healthy Foods Have No Calories

Nuts, olive oil, avocado, nut butter, and granola can all be nutritious.

They can also contain substantial calories.

Mistake 7: Having Uncontrolled Cheat Days

A large enough weekend surplus can erase much of the calorie deficit you created during the week.

Mistake 8: Changing the Diet Every Few Days

Fat loss requires enough time to identify trends.

Constantly changing calories makes it impossible to know what is working.

Mistake 9: Only Doing Cardio

Include resistance training to help preserve muscle and strength.

Mistake 10: Expecting Linear Weight Loss

Your weight will not decrease perfectly every morning.

Look at long-term averages.


Practical Fat-Loss Tips

Make Protein the Center of Each Meal

This makes reaching your daily target much easier.

Eat High-Volume Foods

Vegetables, fruit, potatoes, soups, and lean proteins can help you feel fuller on fewer calories.

Keep Easy Foods Available

Useful foods include:

  • Eggs
  • Greek yogurt
  • Chicken
  • Tuna
  • Fruit
  • Potatoes
  • Oats
  • Frozen vegetables
  • Rice
  • Cottage cheese

Measure Calorie-Dense Ingredients

Especially:

  • Cooking oil
  • Nut butter
  • Nuts
  • Dressings
  • Sauces

Small-looking portions can contain many calories.

Keep Your Diet Flexible

You do not need to eat perfectly every day.

Leave some room for foods you enjoy so your diet does not feel like punishment.

Sleep Properly

Poor sleep can make dieting harder by increasing fatigue, reducing training quality, and making hunger management more difficult.

Be Patient

Fat loss is measured in months, not days.

The best diet is not the one that produces the fastest first week.

It is the one you can follow long enough to reach your goal while maintaining your health and performance.


Final Thoughts

Successful fat loss is not built on starvation, carbohydrate fear, fat burners, or perfect meal timing.

It comes down to a few fundamentals:

  • Create a sustainable calorie deficit.
  • Eat enough protein.
  • Continue resistance training.
  • Keep enough carbohydrates to support performance.
  • Include healthy fats.
  • Choose mostly filling, nutrient-dense foods.
  • Stay active.
  • Track long-term progress rather than daily fluctuations.
  • Make small adjustments when necessary.
  • Stay consistent long enough for the process to work.

Your goal is not simply to become lighter.

Your goal is to lose fat while keeping as much strength and muscle as possible.

Build your diet around that objective and fat loss becomes much simpler.

Learn more about Nutrition for Workouts here.


FAQ

Q1: Do I have to count calories to lose fat?
No. Fat loss still requires a calorie deficit, but you do not necessarily need to track every calorie. Portion control, consistent meals, food choices, and monitoring progress can also create a deficit. Calorie tracking can simply make intake easier to measure.

Q2: How quickly should I lose weight?
Around 0.5–1% of bodyweight per week is a practical general target for many people, although the appropriate rate depends on body composition, starting weight, performance goals, and individual circumstances.

Q3: Can I build muscle while losing fat?
It is possible, especially for beginners, people returning after time away from training, and people carrying more body fat. More advanced and lean athletes generally find simultaneous muscle gain and fat loss more difficult.


At-Gym Fat-Loss Program: The Warrior’s Protocol

Lose Fat. Preserve Strength. Build a Leaner, Better-Conditioned Body.

The At-Gym Fat-Loss Program: The Warrior’s Protocol combines resistance training, cardiovascular exercise, conditioning, core work, and recovery to help reduce body fat while maintaining as much muscle and strength as possible.

Fat loss does not require turning every gym session into an exhausting circuit. The foundation is a sustainable calorie deficit, while resistance training helps maintain muscle, cardio increases energy expenditure and develops cardiovascular fitness, and adequate protein, sleep, and recovery support performance throughout the process.

This 8-week program provides both 3-day and 6-day training options, allowing you to choose a schedule based on your fitness level, recovery, lifestyle, and available training time.

Benefits of the At-Gym Fat-Loss Program

  • Supports sustainable body-fat reduction
  • Helps preserve muscle during a calorie deficit
  • Maintains and develops strength
  • Improves cardiovascular endurance
  • Develops muscular endurance
  • Increases overall work capacity
  • Combines resistance training and cardio
  • Provides structured conditioning without excessive HIIT
  • Strengthens the core
  • Offers flexible 3-day and 6-day schedules
  • Uses a wide variety of gym equipment
  • Builds sustainable training habits

How Does Fat Loss Actually Work?

Fat loss occurs when you consistently consume less energy than your body expends over time, creating a calorie deficit.

Training is an important part of the process, but exercise doesn’t eliminate the need to manage calorie intake.

The Warrior’s Protocol combines four major components:

  • Resistance Training – Helps preserve muscle and strength
  • Steady-State Cardio – Builds aerobic fitness and increases energy expenditure
  • High-Intensity Conditioning – Develops cardiovascular capacity and work capacity
  • Nutrition – Establishes the calorie deficit required for fat loss

Daily physical activity outside the gym also contributes to total energy expenditure.

The objective isn’t simply to burn the maximum number of calories during every workout. It’s to create a routine you can consistently perform while maintaining enough recovery to train productively.


Equipment Needed

This program assumes access to a commercial gym.

  • Barbell and Weight Plates
  • Dumbbells
  • Adjustable Bench
  • Squat Rack
  • Cable Machine
  • Pull-Up Bar
  • Lat Pulldown
  • Seated Cable Row
  • Leg Press
  • Leg Curl Machine
  • Leg Extension Machine
  • Treadmill
  • Stationary Bike
  • Rowing Machine
  • Stair Climber
  • Kettlebells
  • Battle Ropes

You don’t need every piece of cardio equipment. Choose suitable alternatives when necessary.


Weekly Training Structure

Option 1 – 3-Day Fat-Loss Plan

  • Monday – Full-Body Strength + Conditioning
  • Tuesday – Rest or Walking
  • Wednesday – Full-Body Strength + Cardio
  • Thursday – Rest or Walking
  • Friday – Full-Body Strength + Conditioning
  • Saturday – Optional Low-Intensity Cardio
  • Sunday – Rest

The 3-day option provides more recovery and works particularly well for people who have limited training time or are relatively new to combining resistance training and cardio.

Option 2 – 6-Day Fat-Loss Plan

  • Monday – Upper-Body Strength
  • Tuesday – Lower-Body Strength
  • Wednesday – Steady-State Cardio + Core
  • Thursday – Upper & Lower Hypertrophy
  • Friday – Conditioning
  • Saturday – Low-Intensity Cardio + Mobility
  • Sunday – Rest

Six training days do not mean six high-intensity sessions.

Hard resistance and conditioning workouts are deliberately separated by easier aerobic sessions to make the workload more manageable.


Pre-Workout Warm-Up Routine

Spend approximately 5–10 minutes preparing for strength and conditioning sessions.

General Warm-Up

Perform 3–5 minutes of easy activity:

  • Treadmill Walking
  • Stationary Cycling
  • Elliptical
  • Light Rowing

Dynamic Mobility

Perform:

Before heavy compound exercises, perform several progressively heavier warm-up sets.

For cardio-only sessions, simply begin at an easy pace and gradually increase the intensity.


3-Day At-Gym Fat-Loss Workout Plan

Monday – Full-Body Strength + Conditioning

Strength Workout

  • Barbell Back Squat – 3 sets × 6–10 reps
  • Barbell or Dumbbell Bench Press – 3 sets × 6–10 reps
  • Lat Pulldown or Assisted Pull-Ups – 3 sets × 8–12 reps
  • Romanian Deadlift – 3 sets × 8–12 reps
  • Seated Cable Row – 3 sets × 8–12 reps

Rest approximately 2–3 minutes after demanding compound exercises and 1–2 minutes after other movements.

Conditioning Finisher

Choose one:

Option 1 – Rower

  • 30 seconds hard
  • 60–90 seconds easy
  • 5–6 rounds

Option 2 – Stationary Bike

  • 30 seconds hard
  • 60–90 seconds easy
  • 5–6 rounds

The hard intervals should be challenging without requiring an all-out maximal sprint every round.

Wednesday – Full-Body Strength + Cardio

Strength Workout

  • Leg Press – 3 sets × 10–15 reps
  • Incline Dumbbell Press – 3 sets × 8–12 reps
  • Chest-Supported Row – 3 sets × 8–12 reps
  • Dumbbell Walking Lunges – 3 sets × 8–10 reps each leg
  • Dumbbell Shoulder Press – 3 sets × 8–12 reps
  • Leg Curl – 2 sets × 10–15 reps

Rest 1–2 minutes between most exercises.

Steady-State Cardio

Choose one:

  • Incline Treadmill Walking – 25–40 minutes
  • Stationary Cycling – 25–40 minutes
  • Elliptical – 25–40 minutes

Keep the intensity sustainable rather than turning the cardio session into another high-intensity workout.

Friday – Full-Body Strength + Conditioning

Strength Workout

  • Trap-Bar Deadlift – 3 sets × 5–8 reps
  • Dumbbell Bench Press – 3 sets × 8–12 reps
  • Pull-Ups or Lat Pulldowns – 3 sets × 6–10 reps
  • Bulgarian Split Squats – 3 sets × 8–12 reps each leg
  • Cable Face Pulls – 2 sets × 12–20 reps
  • Cable Tricep Pushdowns – 2 sets × 10–15 reps
  • Dumbbell Bicep Curls – 2 sets × 10–15 reps

Rest 2–3 minutes after Trap-Bar Deadlifts and approximately 1–2 minutes after the remaining exercises.

Conditioning Circuit

Complete 3 rounds:

  • Kettlebell Swings – 15 reps
  • Battle Ropes – 20–30 seconds
  • Sled Push – 15–25 metres
  • Rowing Machine – 200 metres

Rest 60–120 seconds between rounds.

If your gym doesn’t have a sled or battle ropes, replace them with another suitable conditioning exercise.

Optional Saturday – Low-Intensity Cardio

Choose one:

  • Incline Treadmill Walk – 30–60 minutes
  • Stationary Bike – 30–45 minutes
  • Elliptical – 30–45 minutes
  • Easy Swimming – 20–40 minutes

Keep the session easy enough that it doesn’t interfere with recovery.


6-Day At-Gym Fat-Loss Workout Plan

Monday – Upper-Body Strength

Main Workout

  • Barbell Bench Press – 4 sets × 5–8 reps
  • Pull-Ups or Lat Pulldowns – 4 sets × 6–10 reps
  • Seated Dumbbell Shoulder Press – 3 sets × 8–12 reps
  • Chest-Supported Row – 3 sets × 8–12 reps
  • Cable Lateral Raises – 2 sets × 12–20 reps
  • Cable Tricep Pushdowns – 2 sets × 10–15 reps
  • Dumbbell Bicep Curls – 2 sets × 10–15 reps

Rest 2–3 minutes after demanding compound movements and approximately 60–120 seconds after isolation exercises.

Optional Core Finisher

  • Hanging Knee Raises – 3 sets × 10–15 reps
  • Plank – 3 sets × 30–60 seconds

Tuesday – Lower-Body Strength

Main Workout

  • Barbell Back Squat – 4 sets × 5–8 reps
  • Romanian Deadlift – 3 sets × 8–12 reps
  • Leg Press – 3 sets × 10–15 reps
  • Seated Leg Curl – 3 sets × 10–15 reps
  • Standing Calf Raises – 3 sets × 12–20 reps

Rest 2–3 minutes after Squats and Romanian Deadlifts and approximately 60–120 seconds after machine exercises.

Optional Core Finisher

  • Cable Crunches – 3 sets × 10–15 reps
  • Side Plank – 2 sets × 30–45 seconds each side

Wednesday – Steady-State Cardio + Core

Cardio

Choose one:

  • Incline Treadmill Walking – 35–50 minutes
  • Stationary Cycling – 35–50 minutes
  • Elliptical – 35–50 minutes
  • Stair Climber – 20–35 minutes

Maintain a steady effort you can sustain throughout the session.

Core Workout

  • Hanging Leg Raises – 3 sets × 8–15 reps
  • Cable Crunches – 3 sets × 10–15 reps
  • Pallof Press – 3 sets × 10–15 reps each side
  • Dead Bug – 2 sets × 10 reps each side

Core training should be controlled rather than performed as quickly as possible.

Thursday – Upper & Lower Hypertrophy

This session uses moderate loads and a variety of machines, cables, and dumbbells to provide additional muscle stimulus.

Main Workout

  • Incline Dumbbell Press – 3 sets × 8–12 reps
  • Seated Cable Row – 3 sets × 8–12 reps
  • Hack Squat – 3 sets × 8–12 reps
  • Lat Pulldown – 3 sets × 10–12 reps
  • Dumbbell Walking Lunges – 2 sets × 10 reps each leg
  • Cable Lateral Raises – 2 sets × 12–20 reps
  • Leg Curl – 2 sets × 10–15 reps

Rest approximately 60–120 seconds between sets.

You don’t need to take every exercise to complete muscular failure. Keep your repetitions controlled and maintain performance throughout the workout.

Friday – Conditioning

After a 5–10 minute warm-up, choose one primary conditioning method.

Option 1 – Rowing Intervals

Complete:

  • 30 seconds hard
  • 90 seconds easy
  • 6–8 rounds

Option 2 – Stationary Bike Intervals

Complete:

  • 30 seconds hard
  • 90 seconds easy
  • 6–8 rounds

Option 3 – Full-Body Conditioning Circuit

Complete 3–4 rounds:

  • Kettlebell Swings – 15 reps
  • Sled Push – 15–25 metres
  • Battle Ropes – 30 seconds
  • Farmer’s Carries – 30–40 metres
  • Rowing Machine – 200 metres

Rest approximately 90 seconds between rounds.

Conditioning quality matters more than simply completing as many rounds as possible.

If your speed, technique, or movement quality deteriorates substantially, extend the rest period or end the session.

Saturday – Low-Intensity Cardio + Mobility

Cardio

Choose one:

  • Incline Treadmill Walking – 40–60 minutes
  • Stationary Cycling – 35–50 minutes
  • Elliptical – 35–50 minutes
  • Easy Swimming – 25–40 minutes

This should be one of the easier sessions of the week.

Mobility

Afterward, perform:

  • Chest Stretch – 20–30 seconds
  • Lat Stretch – 20–30 seconds
  • Hip Flexor Stretch – 20–30 seconds each side
  • Hamstring Stretch – 20–30 seconds each side
  • Quad Stretch – 20–30 seconds each side
  • Calf Stretch – 20–30 seconds each side
  • Child’s Pose – 30–60 seconds

Post-Workout Stretch Routine

After resistance and conditioning sessions, allow your heart rate to gradually settle.

Perform the stretches most relevant to the muscles trained that day.

Upper-Body Sessions

Lower-Body Sessions

Hold each static stretch for approximately 20–30 seconds without forcing yourself into uncomfortable positions.


8-Week Progression Plan

Weeks 1–2 – Establish Your Baseline

Focus on:

  • Learning or refining exercise technique
  • Selecting appropriate working weights
  • Establishing your cardio intensity
  • Completing conditioning without excessive fatigue
  • Maintaining a consistent calorie deficit

Don’t begin the program at maximum intensity.

Weeks 3–4 – Build Training Capacity

Gradually:

  • Add repetitions within prescribed ranges
  • Add small amounts of resistance when appropriate
  • Increase steady-state cardio by approximately 5 minutes if needed
  • Add an interval only if recovery remains good

Weeks 5–6 – Progress Resistance & Performance

Aim to:

  • Increase resistance on selected strength exercises
  • Reach the upper end of more repetition ranges
  • Improve cardio pace at a similar effort
  • Maintain better output across conditioning rounds

Weeks 7–8 – Consolidate Progress

Continue improving:

  • Resistance
  • Repetitions
  • Technique
  • Cardio performance
  • Conditioning quality

Don’t simultaneously add more weight, sets, intervals, cardio duration, and training intensity.

Fat-loss programming still needs to be recoverable.


How to Progress Your Strength Training While Cutting

Being in a calorie deficit can make progression slower, particularly for experienced lifters.

Use double progression rather than expecting to increase weight every week.

For example:

Bench Press – 4 sets × 5–8 reps

Progress through the repetition range while maintaining good technique.

Once you can perform the upper end of the range across your working sets, slightly increase the resistance.

During a fat-loss phase, maintaining strength can itself be a successful outcome, particularly as body weight decreases.

How Hard Should You Train?

Most resistance-training sets should be challenging without requiring complete muscular failure.

For many exercises, finishing with approximately 1–3 good repetitions still possible is a practical approach.

Conditioning should also vary in intensity.

You don’t need:

  • HIIT every day
  • A finisher after every strength session
  • Minimal rest between heavy compound lifts
  • Maximum-effort cardio after every workout

Fat loss is not determined by how exhausted you feel when leaving the gym.

Cardio Strategy for Fat Loss

A balanced cardio plan uses both easier aerobic work and limited high-intensity conditioning.

Steady-State Cardio

Perform approximately 2–3 sessions per week, depending on your schedule and recovery.

Good options include:

  • Incline Walking
  • Cycling
  • Elliptical
  • Stair Climber
  • Swimming

High-Intensity Conditioning

Approximately 1–2 weekly sessions can be sufficient for many trainees.

HIIT is demanding. More isn’t automatically better.

Daily Activity

Try to remain active outside the gym.

Walking is particularly useful because it can increase daily activity without creating the same recovery demands as repeated high-intensity training.

Rather than treating an exact step target as mandatory, establish your normal activity level and gradually increase daily movement when appropriate.


Nutrition for Fat Loss

Training supports your fat-loss goal, but maintaining a calorie deficit is what drives body-weight reduction over time.

Maintain a Moderate Calorie Deficit

Avoid unnecessarily aggressive calorie restriction.

A moderate deficit is generally easier to sustain while maintaining training performance, recovery, and lean mass.

Prioritize Protein

For many resistance-trained people dieting for fat loss, approximately 1.6–2.2 grams of protein per kilogram of body weight per day is a practical starting range.

Protein-rich foods include:

  • Chicken
  • Eggs
  • Fish
  • Lean Meat
  • Milk and Yogurt
  • Lentils
  • Beans

Keep Carbohydrates in Your Diet

Carbohydrates can support resistance training and conditioning performance.

Useful sources include:

  • Rice
  • Roti
  • Oats
  • Potatoes
  • Fruit
  • Whole Grains

The appropriate amount depends on your calorie target, training demands, and dietary preferences.

Include Dietary Fats

Include foods such as:

  • Nuts
  • Seeds
  • Olive Oil
  • Eggs
  • Fish

Total calorie intake still matters regardless of whether calories come from carbohydrates, protein, or fat.

You Don’t Need to Ban Sugar or Junk Food Completely

Fat loss doesn’t require a perfect diet.

Base most of your intake around nutritious, minimally processed foods while allowing reasonable flexibility within your overall calorie and nutrient targets.

A diet you can sustain is more useful than an extremely restrictive diet you repeatedly abandon.


How Fast Should You Lose Weight?

A gradual rate of weight loss is usually preferable when maintaining muscle and training performance matters.

For many people, approximately 0.5–1% of body weight per week can serve as a useful general range, although individual circumstances vary.

People who are already relatively lean may benefit from a slower rate.

If weight is dropping rapidly while strength, energy, mood, and recovery are deteriorating, the calorie deficit may be unnecessarily aggressive.

How to Track Fat-Loss Progress

Use multiple measurements rather than relying on one scale reading.

Track:

  • Body Weight
  • Weekly Average Weight
  • Waist Circumference
  • Progress Photos
  • Gym Performance
  • Cardio Performance
  • How Clothes Fit

Daily body weight naturally fluctuates because of hydration, sodium, glycogen, food intake, and other factors.

Look at trends across several weeks.

What If Fat Loss Stalls?

Don’t change your program because the scale hasn’t moved for several days.

If your average weight and measurements remain unchanged for approximately 2–3 weeks, first check your consistency.

If adherence has been good, consider making one small adjustment:

  • Slightly reduce calorie intake
  • Increase daily walking
  • Add a small amount of steady-state cardio
  • Slightly increase existing cardio duration

Then give the adjustment time to work.

Avoid immediately combining a large calorie reduction with dramatically more cardio.


Strength Training vs. Cardio During Fat Loss

Both serve different purposes.

Resistance training provides a strong reason for your body to retain muscle while dieting.

Cardio improves cardiovascular fitness and can increase energy expenditure.

You don’t need to turn resistance training into cardio by rushing through heavy exercises with minimal rest.

Rest sufficiently to maintain the quality of your strength work, then use dedicated cardio and conditioning sessions for cardiovascular training.


Recovery During a Fat-Loss Phase

Recovery becomes increasingly important when calorie intake is reduced.

Sleep

Aim for approximately 7–9 hours of sleep per night when possible.

Hydration

Drink according to your activity, climate, thirst, and sweat losses.

Long cardio sessions and hot environments may increase fluid needs substantially.

Rest Days

Sunday is a genuine recovery day.

Walking and gentle mobility are fine, but you don’t need to add another hard workout simply because you feel motivated.

Deloading

You don’t automatically need a deload at a fixed interval.

Consider reducing training volume or intensity when accumulated fatigue produces persistent declines in performance, recovery, or motivation.


What Results Can You Expect in 8 Weeks?

Results will vary according to starting body composition, calorie deficit, training history, nutrition, activity, genetics, sleep, and consistency.

Over eight weeks, successful trainees may experience:

  • Reduced body weight
  • Reduced waist circumference
  • Improved muscle definition
  • Maintained or improved strength
  • Better cardiovascular fitness
  • Improved muscular endurance
  • Better conditioning
  • Improved exercise technique
  • More consistent nutrition and training habits

Don’t judge the program entirely by kilograms lost.

If your waist is decreasing and your body weight is trending downward while you maintain much of your strength and muscle, you’re making meaningful progress.


Final Thoughts

The At-Gym Fat-Loss Program: The Warrior’s Protocol combines the major tools available in a gym—free weights, machines, cables, steady-state cardio, intervals, and conditioning—into one structured fat-loss program.

The goal isn’t to make every workout brutal. It’s to reduce body fat while giving your body a strong reason to maintain muscle, strength, and performance.

Choose the 3-day option when you want greater recovery and a smaller weekly commitment, or the 6-day option when you already have a strong training foundation and can recover from more frequent sessions.

Create a sustainable calorie deficit. Keep lifting. Consume enough protein. Use cardio intelligently. Stay active. Sleep properly. Track your progress.

Then repeat those fundamentals long enough for them to work.


At-Home Fat-Loss Program: The Warrior’s Protocol

Build a Leaner, Stronger, Better-Conditioned Body — No Gym Required

The At-Home Fat-Loss Program: The Warrior’s Protocol combines resistance training, cardiovascular exercise, conditioning, core work, and recovery to help you reduce body fat while maintaining strength and athletic performance.

Instead of trying to burn as many calories as possible in every workout, this program takes a balanced approach. Strength sessions help preserve muscle, cardio develops endurance and increases energy expenditure, conditioning improves work capacity, and proper nutrition creates the calorie deficit ultimately required for fat loss.

The program runs for 8 weeks and provides both 3-day and 6-day training options, allowing you to choose the schedule that best fits your fitness level, recovery, and lifestyle.

Click on any exercise to learn how to do it.

Benefits of the At-Home Fat-Loss Program

  • Supports body-fat reduction
  • Helps maintain muscle during a calorie deficit
  • Builds and maintains functional strength
  • Improves cardiovascular endurance
  • Develops muscular endurance
  • Increases overall work capacity
  • Strengthens the core
  • Requires minimal equipment
  • Provides both 3-day and 6-day training options
  • Develops sustainable training habits

How Does Fat Loss Actually Work?

Fat loss occurs when your body consistently uses more energy than you consume over time, creating a calorie deficit.

Exercise helps, but trying to compensate for an uncontrolled diet with increasingly exhausting workouts isn’t an effective long-term strategy.

The Warrior’s Protocol combines four major components:

  • Resistance Training – Helps maintain muscle and strength
  • Cardio – Improves cardiovascular fitness and increases energy expenditure
  • Conditioning – Develops work capacity and athleticism
  • Nutrition – Creates and maintains a sustainable calorie deficit

Daily movement outside formal workouts also matters. Walking, taking stairs, doing household tasks, and generally remaining active can contribute meaningfully to your overall energy expenditure.


Equipment Needed

You only need a basic home setup.

Most exercises can be modified according to the equipment you have available.


Weekly Training Structure

Option 1 – 3-Day Fat-Loss Plan

  • Monday – Full-Body Strength + Conditioning
  • Tuesday – Rest or Walking
  • Wednesday – Full-Body Strength + Cardio
  • Thursday – Rest or Walking
  • Friday – Full-Body Strength + Conditioning
  • Saturday – Optional Low-Intensity Cardio
  • Sunday – Rest

The 3-day option is ideal if you’re relatively new to structured training, have a busy schedule, or want more recovery between sessions.

Option 2 – 6-Day Fat-Loss Plan

  • Monday – Upper-Body Strength
  • Tuesday – Lower-Body Strength
  • Wednesday – Cardio + Core
  • Thursday – Full-Body Strength
  • Friday – Conditioning
  • Saturday – Low-Intensity Cardio + Mobility
  • Sunday – Rest

The 6-day version doesn’t mean six maximum-intensity workouts. Hard strength and conditioning sessions are deliberately balanced with easier aerobic and recovery-focused days.


Pre-Workout Warm-Up Routine

Perform this dynamic warm-up before strength and conditioning sessions for approximately 5–8 minutes.

For cardio sessions, begin with several minutes of easy walking or jogging before increasing your pace.


3-Day At-Home Fat-Loss Workout Plan

Monday – Full-Body Strength + Conditioning

Strength Workout

  • Backpack Squats – 3 sets × 10–15 reps
  • Push-Ups – 3 sets × 8–15 reps
  • Pull-Ups or Band-Assisted Pull-Ups – 3 sets × 5–10 reps
  • Backpack Romanian Deadlifts – 3 sets × 10–15 reps
  • Resistance Band Rows – 3 sets × 10–15 reps

Rest 60–90 seconds between sets.

Conditioning Finisher

Complete 3 rounds:

Rest 60 seconds between rounds.

Wednesday – Full-Body Strength + Cardio

Strength Workout

Rest 60–90 seconds between sets.

Cardio

Choose one:

  • Brisk Walking – 30–45 minutes
  • Easy Jogging – 20–30 minutes
  • Cycling – 30–45 minutes
  • Jump Rope – 10–15 minutes using manageable intervals

Keep the effort sustainable rather than turning the session into a race.

Friday – Full-Body Strength + Conditioning

Strength Workout

  • Bulgarian Split Squats – 3 sets × 8–12 reps each leg
  • Decline Push-Ups – 3 sets × 8–15 reps
  • Chin-Ups or Assisted Chin-Ups – 3 sets × 5–10 reps
  • Single-Leg Glute Bridges – 3 sets × 10–15 reps each leg
  • Backpack Rows – 3 sets × 10–15 reps

Rest 60–90 seconds between sets.

Conditioning Circuit

Complete 3–4 rounds:

Rest 60–90 seconds between rounds.

Optional Saturday – Low-Intensity Cardio

Choose one activity:

  • Brisk Walk – 30–60 minutes
  • Easy Jog – 20–30 minutes
  • Cycling – 30–45 minutes
  • Light Hiking – 30–60 minutes

Keep the intensity moderate enough that you could still speak in short sentences comfortably.


6-Day At-Home Fat-Loss Workout Plan

Monday – Upper-Body Strength

Main Workout

  • Weighted or Standard Push-Ups – 4 sets × 8–15 reps
  • Pull-Ups – 4 sets × 5–10 reps
  • Pike Push-Ups – 3 sets × 8–12 reps
  • Resistance Band Rows – 3 sets × 10–15 reps
  • Dips – 3 sets × 8–12 reps
  • Resistance Band Face Pulls – 3 sets × 12–20 reps

Rest 60–120 seconds between sets.

Core Finisher

Tuesday – Lower-Body Strength

Main Workout

  • Backpack Squats – 4 sets × 10–15 reps
  • Bulgarian Split Squats – 3 sets × 8–12 reps each leg
  • Backpack Romanian Deadlifts – 4 sets × 10–15 reps
  • Reverse Lunges – 3 sets × 10 reps each leg
  • Single-Leg Calf Raises – 3 sets × 15–20 reps each leg

Rest 60–120 seconds between sets.

Core Finisher

  • Dead Bug – 3 sets × 10 reps each side
  • Side Plank – 3 sets × 30–45 seconds each side

Wednesday – Cardio + Core

Cardio

Choose one:

  • Brisk Walking – 40–60 minutes
  • Easy Jogging – 25–40 minutes
  • Cycling – 30–45 minutes

Maintain a steady, sustainable pace.

Core Workout

Thursday – Full-Body Strength

Main Workout

  • Weighted Push-Ups – 3 sets × 8–12 reps
  • Chin-Ups – 3 sets × 6–10 reps
  • Backpack Front Squats – 3 sets × 10–15 reps
  • Backpack Bent-Over Rows – 3 sets × 10–15 reps
  • Single-Leg Romanian Deadlifts – 3 sets × 8–12 reps each leg
  • Resistance Band Shoulder Press – 3 sets × 10–15 reps

Rest 60–120 seconds between sets.

Friday – Conditioning

Perform 4 rounds:

Rest 60–90 seconds between rounds.

The goal is controlled, sustained conditioning. Don’t sacrifice exercise technique simply to finish a round faster.

Saturday – Low-Intensity Cardio + Mobility

Cardio

Choose one:

  • Brisk Walk – 45–60 minutes
  • Easy Jog – 25–40 minutes
  • Cycling – 30–45 minutes
  • Hiking – 45–60 minutes

Mobility

Afterward, perform:

Saturday should leave you feeling better rather than exhausted.


Post-Workout Stretch Routine

After strength and conditioning workouts, gradually allow your heart rate to settle.

Perform the stretches most relevant to that day’s training for approximately 20–30 seconds each.

Avoid forcing a stretch beyond a comfortable range.


8-Week Progression Plan

Weeks 1–2 – Build the Foundation

Focus on:

  • Learning exercise technique
  • Finding appropriate resistance
  • Establishing consistent training
  • Completing cardio at a manageable pace

Don’t rush to increase intensity.

Weeks 3–4 – Build Volume

Gradually:

  • Add 1–2 repetitions where appropriate
  • Increase cardio duration by 5–10 minutes
  • Add a fourth conditioning round if three rounds have become comfortable

Weeks 5–6 – Increase Resistance

Progress by:

  • Adding a small amount of backpack weight
  • Increasing resistance-band tension
  • Using harder exercise variations
  • Maintaining controlled repetitions

Weeks 7–8 – Improve Performance

Aim to:

  • Use slightly greater resistance
  • Reach the upper end of prescribed rep ranges
  • Improve cardio distance or pace
  • Complete conditioning rounds with better control and less unnecessary rest

Don’t increase resistance, repetitions, rounds, cardio duration, and intensity all at once.


Nutrition for Fat Loss

Your workouts support fat loss, but nutrition determines whether you consistently maintain an energy deficit.

Maintain a Moderate Calorie Deficit

Aim to consume slightly fewer calories than your body uses rather than drastically cutting food intake.

A severe deficit can make training performance, recovery, hunger management, and muscle retention more difficult.

Prioritize Protein

Include protein-rich foods throughout your day, such as:

  • Eggs
  • Chicken
  • Fish
  • Lean meat
  • Milk and yogurt
  • Lentils
  • Beans
  • Other protein-rich foods that fit your diet

Protein helps support muscle retention and recovery while losing weight.

Build Meals Around Nutritious Foods

Prioritize:

  • Protein-rich foods
  • Fruits
  • Vegetables
  • Whole grains
  • Legumes
  • Healthy fats

You don’t need to completely ban particular foods. Your overall calorie intake and dietary consistency matter more than labeling individual foods as “good” or “bad.”

Stay Hydrated

Drink regularly throughout the day and increase fluid intake when training in hot conditions or sweating heavily.

Rather than forcing everyone to drink an arbitrary fixed amount, use thirst, activity, climate, and urine color as practical guides to hydration.


Cardio vs. Strength Training for Fat Loss

You don’t need to choose one.

Strength training helps preserve muscle and strength while you’re losing weight.

Cardio improves cardiovascular fitness and provides another way to increase energy expenditure.

Combining both gives the Warrior’s Protocol its balanced approach.

Don’t replace every strength workout with cardio simply because your goal is fat loss. Losing weight while maintaining muscle is generally preferable to simply making the number on the scale fall as quickly as possible.


How Fast Should You Lose Weight?

Fat loss should generally be gradual.

A useful target for many people is roughly 0.5–1% of body weight per week, although the appropriate rate varies with starting body composition, training experience, and individual circumstances.

If your body weight is falling very quickly while strength, energy, recovery, and training performance are collapsing, your calorie deficit may be unnecessarily aggressive.

How to Track Fat-Loss Progress

Don’t rely entirely on the scale.

Track several indicators:

  • Body weight
  • Waist circumference
  • Progress photos
  • Workout performance
  • How your clothes fit

Body weight naturally fluctuates because of hydration, food intake, glycogen, sodium, and other factors.

If weighing yourself, compare weekly trends rather than reacting to individual daily readings.

What If Fat Loss Stops?

A few days without scale movement doesn’t mean you’ve reached a plateau.

If your average weight and waist measurement haven’t changed for 2–3 weeks, first check whether you’ve actually been consistent with your nutrition and activity.

Then consider making a small adjustment, such as:

  • Slightly reducing calorie intake
  • Increasing daily walking
  • Adding a small amount of cardio
  • Improving dietary consistency

Avoid responding to every plateau by dramatically cutting food and adding large amounts of exercise.


Warrior Protocol Rules

  • Follow either the 3-day or 6-day schedule consistently.
  • Maintain a sustainable calorie deficit.
  • Keep resistance training in your program.
  • Stay physically active outside your workouts.
  • Progress training gradually.
  • Prioritize protein and nutritious foods.
  • Stay adequately hydrated.
  • Aim for 7–9 hours of sleep per night.
  • Take recovery seriously.
  • Track trends instead of chasing daily scale changes.

Discipline doesn’t mean doing the maximum amount of work every day. It means consistently doing what moves you toward your goal.


What Results Can You Expect in 8 Weeks?

Results vary considerably depending on starting body composition, nutrition, activity, training experience, sleep, and consistency.

Over eight weeks, consistent trainees may experience:

  • Reduced body weight and waist circumference
  • Improved muscle definition
  • Better cardiovascular endurance
  • Greater muscular endurance
  • Maintained or improved strength
  • Better conditioning
  • Improved training habits

Avoid judging the success of the program solely by how many kilograms you lose. Preserving strength and muscle while steadily reducing body fat is meaningful progress.


Final Thoughts

The At-Home Fat-Loss Program: The Warrior’s Protocol is designed to help you become leaner without turning fat loss into endless cardio or exhausting daily circuits.

Successful fat loss comes from combining a sustainable calorie deficit with resistance training, cardiovascular exercise, daily movement, adequate protein, quality sleep, and consistent recovery.

Choose the 3-day option if you need more recovery or a simpler weekly commitment. Choose the 6-day option if you already have a solid fitness foundation and prefer more frequent training.

You don’t need every workout to leave you destroyed.

You need a plan you can execute consistently, a nutrition strategy you can sustain, and enough patience to let those habits compound.

Train with purpose. Eat with discipline. Recover properly. Stay consistent.


At-Gym Advanced PPL Training Plan (Push-Pull-Legs)

An At-Gym Advanced PPL Training Plan is designed for experienced lifters who have already built substantial strength, developed reliable exercise technique, and learned how their bodies respond to different levels of training volume and intensity.

This program uses a Push Pull Legs (PPL) structure while separating sessions into different training emphases. Heavy compound lifts develop strength, moderate-repetition work provides substantial hypertrophy stimulus, and carefully selected isolation exercises allow additional work for individual muscle groups without making every exercise maximally fatiguing.

The plan includes both 3-day and 6-day options. The 6-day version uses separate A and B workouts with different exercises, rep ranges, and priorities to provide the exercise diversity expected from a proper advanced gym program.

Benefits of an At-Gym Advanced PPL Training Plan

  • Builds advanced strength and muscle
  • Provides high-quality training volume across major muscle groups
  • Combines strength and hypertrophy-focused rep ranges
  • Trains muscles through multiple angles and movement patterns
  • Includes barbells, dumbbells, cables, and machines
  • Develops unilateral strength and muscular balance
  • Allows advanced progressive overload
  • Provides dedicated compound and isolation work
  • Offers flexible 3-day and 6-day schedules
  • Allows volume and intensity to be adjusted according to recovery

What Is an Advanced PPL Training Split?

PPL stands for Push, Pull, and Legs:

  • Push – Chest, shoulders, and triceps
  • Pull – Back, biceps, rear delts, and forearms
  • Legs – Quads, hamstrings, glutes, and calves

At the advanced level, simply adding more exercises and sets isn’t necessarily the best way to progress.

Training needs to balance stimulus, fatigue, performance, and recovery.

For this reason, the program uses two different rotations:

  • Push A – Strength Emphasis
  • Pull A – Strength Emphasis
  • Legs A – Strength Emphasis
  • Push B – Hypertrophy Emphasis
  • Pull B – Hypertrophy Emphasis
  • Legs B – Hypertrophy Emphasis

The strength-focused sessions prioritize demanding compound exercises with lower-to-moderate repetition ranges and longer rest periods.

The hypertrophy-focused sessions use different exercises, somewhat higher repetition ranges, and additional machine, cable, and isolation work.


Equipment Needed

This program assumes access to a well-equipped gym.

  • Barbell and Weight Plates
  • Power Rack or Squat Rack
  • Adjustable Dumbbells
  • Flat and Adjustable Bench
  • Cable Station
  • Pull-Up Bar
  • Dip Station
  • Lat Pulldown
  • Seated Cable Row
  • Chest Press or Plate-Loaded Press
  • Hack Squat
  • Leg Press
  • Leg Extension
  • Seated and/or Lying Leg Curl
  • Calf Raise Machine
  • Pec Deck / Reverse Pec Deck
  • Exercise Mat

You don’t need every exact machine listed. Substitute an exercise with a similar movement when necessary.


Weekly Training Structure

Option 1 – 3-Day Advanced PPL

  • Monday – Push
  • Tuesday – Rest
  • Wednesday – Pull
  • Thursday – Rest
  • Friday – Legs
  • Saturday – Rest or Light Activity
  • Sunday – Rest

Alternate between the A and B workouts each week.

Week 1: Push A, Pull A, Legs A

Week 2: Push B, Pull B, Legs B

Then repeat.

The 3-day schedule is particularly useful for advanced lifters who perform other demanding physical training or prefer fewer but highly focused gym sessions.

Option 2 – 6-Day Advanced PPL

  • Monday – Push A
  • Tuesday – Pull A
  • Wednesday – Legs A
  • Thursday – Push B
  • Friday – Pull B
  • Saturday – Legs B
  • Sunday – Rest

The 6-day schedule distributes training volume across more sessions and trains each movement group twice per week.

Advanced trainees should still adjust volume according to their recovery rather than assuming every listed set must always be performed.


Pre-Workout Warm-Up Routine

Spend approximately 5–10 minutes preparing for each session.

General Warm-Up

Perform 3–5 minutes of easy activity:

  • Treadmill Walking
  • Stationary Cycling
  • Elliptical
  • Rowing Machine

The purpose is to increase body temperature rather than create fatigue.

Dynamic Mobility

Select movements relevant to the day’s training:

Exercise-Specific Warm-Up Sets

For your first heavy compound lift, progressively work toward your working weight.

For example, before heavy Bench Press:

  • Empty Bar – 10–15 reps
  • Approximately 40–50% Working Weight – 6–8 reps
  • Approximately 60–70% – 3–5 reps
  • Approximately 75–85% – 1–3 reps
  • Begin Working Sets

These percentages are only practical examples. The exact number of warm-up sets should depend on the load, exercise, and individual.

Don’t turn your warm-up into another workout.


Push A – Strength Emphasis

Push A prioritizes heavy horizontal and vertical pressing while maintaining sufficient chest, shoulder, and triceps volume.

Main Workout

  • Barbell Bench Press – 4 sets × 4–6 reps
  • Standing Barbell Overhead Press – 3 sets × 5–8 reps
  • Incline Dumbbell Press – 3 sets × 6–10 reps
  • Weighted Dips – 3 sets × 6–10 reps
  • Cable Lateral Raises – 3 sets × 12–20 reps
  • Cable Tricep Pushdowns – 3 sets × 10–15 reps

Rest approximately 2–4 minutes after heavy compound exercises and 60–120 seconds after isolation exercises.

Optional Core Finisher

  • Ab Wheel Rollouts – 3 sets × 8–15 reps
  • Cable Pallof Press – 3 sets × 10–15 reps each side

Pull A – Strength Emphasis

Pull A emphasizes weighted vertical pulling and heavy rowing while providing additional rear-delt, biceps, and grip work.

Main Workout

  • Weighted Pull-Ups – 4 sets × 4–8 reps
  • Barbell Rows – 4 sets × 5–8 reps
  • Chest-Supported Rows – 3 sets × 8–12 reps
  • Reverse Pec Deck – 3 sets × 12–20 reps
  • EZ-Bar Curls – 3 sets × 8–12 reps
  • Incline Dumbbell Curls – 2 sets × 10–15 reps

Rest approximately 2–4 minutes after Weighted Pull-Ups and heavy Rows and 60–120 seconds after accessory exercises.

Optional Grip Finisher

  • Farmer’s Carries – 3 sets × 30–45 seconds

Use a challenging weight while maintaining a stable torso and controlled walking pattern.

Optional Core Finisher

  • Hanging Leg Raises – 3 sets × 8–15 reps
  • Cable Woodchops – 3 sets × 10–15 reps each side

Legs A – Strength Emphasis

Legs A centers around heavy squatting while providing substantial posterior-chain and unilateral work.

Main Workout

  • Barbell Back Squat – 4 sets × 4–6 reps
  • Romanian Deadlift – 3 sets × 6–10 reps
  • Leg Press – 3 sets × 8–12 reps
  • Bulgarian Split Squats – 3 sets × 8–10 reps each leg
  • Seated Leg Curls – 3 sets × 10–15 reps
  • Standing Calf Raises – 4 sets × 8–15 reps

Rest approximately 2–4 minutes after Squats and Romanian Deadlifts and 60–120 seconds after accessory exercises.

Optional Core Finisher

  • Weighted Cable Crunches – 3 sets × 10–15 reps
  • Side Plank – 3 sets × 30–60 seconds each side

Push B – Hypertrophy Emphasis

Push B changes pressing angles and relies more heavily on dumbbells, machines, and cables to accumulate productive chest, shoulder, and triceps volume.

Main Workout

  • Incline Barbell Bench Press – 3 sets × 6–10 reps
  • Machine Chest Press – 3 sets × 8–12 reps
  • Seated Dumbbell Shoulder Press – 3 sets × 8–12 reps
  • Cable Chest Fly – 3 sets × 10–15 reps
  • Dumbbell Lateral Raises – 4 sets × 12–20 reps
  • Overhead Cable Tricep Extensions – 3 sets × 10–15 reps
  • Single-Arm Cable Tricep Pushdowns – 2 sets × 12–20 reps each arm

Rest approximately 2–3 minutes after presses and 60–120 seconds after isolation exercises.

Optional Core Finisher

  • Decline or Weighted Sit-Ups – 3 sets × 10–15 reps
  • Dead Bug – 3 sets × 10 reps each side

Pull B – Hypertrophy Emphasis

Pull B uses different grips and rowing angles to provide comprehensive lat and upper-back development while adding direct rear-delt and arm work.

Main Workout

  • Neutral-Grip Lat Pulldowns – 3 sets × 8–12 reps
  • Single-Arm Dumbbell Rows – 3 sets × 8–12 reps each arm
  • Wide-Grip Seated Cable Rows – 3 sets × 10–15 reps
  • Straight-Arm Cable Pulldowns – 3 sets × 12–15 reps
  • Cable Rear-Delt Flyes – 3 sets × 12–20 reps
  • Preacher Curls – 3 sets × 8–12 reps
  • Rope Hammer Curls – 2 sets × 12–15 reps

Rest approximately 2 minutes after demanding rows and pulldowns and 60–120 seconds after isolation exercises.

Optional Grip Finisher

  • Plate Pinch Holds – 3 sets × 20–40 seconds

Optional Core Finisher

  • Hanging Knee Raises – 3 sets × 12–15 reps
  • Cable Pallof Press – 3 sets × 10–15 reps each side

Legs B – Hypertrophy & Unilateral Emphasis

Legs B uses different squat patterns, machine exercises, and unilateral work to train the quads, hamstrings, glutes, and calves.

Main Workout

  • Hack Squat – 3 sets × 6–10 reps
  • Barbell Hip Thrust – 3 sets × 8–12 reps
  • Walking Dumbbell Lunges – 3 sets × 10–12 reps each leg
  • Leg Extensions – 3 sets × 12–15 reps
  • Lying Leg Curls – 3 sets × 10–15 reps
  • Seated Calf Raises – 4 sets × 12–20 reps

Rest approximately 2–3 minutes after Hack Squats and Hip Thrusts and 60–120 seconds after isolation exercises.

If your gym doesn’t have a Hack Squat, use Front Squats, Pendulum Squats, or another suitable squat variation.

Optional Core Finisher

  • Cable Crunches – 3 sets × 12–20 reps
  • Ab Wheel Rollouts – 3 sets × 8–15 reps

Where Do Deadlifts Fit?

Conventional Deadlifts are an excellent exercise, but advanced lifters don’t automatically need to perform them as a high-volume Pull Day movement.

If conventional Deadlift strength is one of your goals, you can include:

Conventional Deadlift – 2–3 sets × 3–5 reps

Place it at the beginning of Pull A or Legs A.

If you add Deadlifts, consider reducing another demanding row or posterior-chain exercise to control overall fatigue.

For example, if you Deadlift on Legs A, you may reduce or remove Romanian Deadlifts during that session.

This allows Deadlifts to serve a clear purpose without simply adding more fatigue to an already demanding program.


Post-Workout Stretch Routine

After training, allow your breathing to settle before performing static stretches.

Hold each stretch for approximately 20–30 seconds.

After Push Workouts

After Pull Workouts

After Leg Workouts

Stretching can help maintain or improve flexibility, but it isn’t necessary to perform a long cooldown after every workout. Prioritize the areas that benefit from additional flexibility work.


Advanced Progressive Overload

At the advanced level, progression often happens more slowly. Adding weight every workout or every week isn’t realistic indefinitely.

Your goal is to produce measurable improvement across longer periods.

Use Double Progression

Suppose Barbell Bench Press is programmed for:

4 sets × 4–6 reps

You might progress:

5, 5, 4, 4 → 6, 5, 5, 4 → 6, 6, 6, 6

Once you reach the upper end of the range with appropriate technique, increase the weight slightly and rebuild.

Use Small Load Increases

Advanced lifters may benefit from smaller increases rather than repeatedly making large jumps.

Microplates can be particularly useful for upper-body compound lifts.

Progress Isolation Exercises Through Repetitions

You don’t need to chase large weight increases on Lateral Raises, Curls, Extensions, and similar exercises.

Increase repetitions within the prescribed range before adding a small amount of resistance.

Track More Than Weight

Progress can also include:

  • Additional repetitions
  • Improved range of motion
  • Better exercise control
  • Better stability
  • Higher-quality repetitions at the same load
  • More total work with similar perceived effort

Small improvements matter when you’re already highly trained.


How Hard Should Advanced Lifters Train?

Most working sets should be challenging, but advanced training doesn’t require taking every set to complete muscular failure.

For many compound exercises, finishing with approximately 1–3 repetitions in reserve (RIR) provides a practical starting point.

Isolation and machine exercises can sometimes be performed closer to failure because they generally involve less systemic fatigue and technical complexity.

However, proximity to failure should be adjusted according to:

  • Exercise
  • Training phase
  • Weekly volume
  • Recovery
  • Technique
  • Individual tolerance

The objective is to stimulate adaptation while remaining capable of repeating productive training week after week.

Managing Training Volume

Advanced lifters often make the mistake of assuming they need enormous training volume.

More isn’t automatically better.

If you’re following the 6-day version, treat the prescribed sets as a framework rather than a requirement to perform maximum volume indefinitely.

Watch for:

  • Persistent performance decline
  • Difficulty recovering between sessions
  • Joint irritation
  • Persistent soreness
  • Loss of motivation
  • Reduced sleep quality
  • Stagnating lifts despite high effort

If these accumulate, consider reducing accessory sets, lowering intensity temporarily, or taking additional recovery.


3-Day vs. 6-Day Advanced PPL

Choose the 3-day option if you:

  • Perform other demanding sports or physical training
  • Use very high effort during individual sessions
  • Need greater recovery between workouts
  • Have limited weekly gym time
  • Prefer longer, highly focused sessions

Choose the 6-day option if you:

  • Have years of consistent resistance-training experience
  • Recover reliably from higher training frequency
  • Prefer distributing volume across more sessions
  • Want to train each movement group twice per week
  • Can consistently support training with adequate nutrition and sleep

The appropriate training frequency is the one that allows you to accumulate enough productive work while continuing to recover and progress.


Nutrition & Recovery

Advanced programming cannot compensate for inadequate recovery.

Protein

For many resistance-trained lifters, approximately 1.6–2.2 grams of protein per kilogram of body weight per day is a practical range for supporting muscle growth or retention.

Calories

Match your calorie intake to your primary goal.

  • Muscle Gain: Use a modest calorie surplus.
  • Maintenance/Recomposition: Eat around maintenance while prioritizing resistance training and protein.
  • Fat Loss: Maintain a sustainable calorie deficit while continuing to train and consume adequate protein.

Carbohydrates

Carbohydrates can help support demanding resistance-training performance.

Prioritize sufficient carbohydrate intake according to your total calorie needs, training volume, and personal dietary preferences.

Hydration

Fluid needs vary according to body size, climate, training duration, and sweat rate.

Drink regularly throughout the day and replace additional fluids when training causes substantial sweating.

Sleep

Aim for approximately 7–9 hours of sleep per night when possible.


When Should You Deload?

You don’t need to automatically deload every 6–8 weeks simply because a calendar says so.

A deload becomes useful when accumulated fatigue is interfering with productive training.

Signs may include:

  • Persistent decline in performance
  • Unusually high fatigue
  • Persistent soreness
  • Repeated poor training sessions
  • Reduced motivation
  • Difficulty recovering between workouts

During a deload, temporarily reduce training volume, load, effort, or a combination of them.

After fatigue has decreased, gradually return to normal training.


How Long Should You Follow This Program?

Run the program for at least 8–12 weeks before making unnecessary major changes.

Advanced lifters can continue using the same overall structure for considerably longer while manipulating individual exercises, volume, and loading according to their goals.

There’s no reason to abandon a program that continues producing measurable progress.


Common Advanced Training Mistakes

Chasing Maximum Weight Every Session

Training and testing are different.

You don’t need to demonstrate your maximum strength every week to become stronger.

Performing Excessive Volume

More exercises and more sets aren’t automatically more effective.

Use enough volume to progress while remaining able to recover.

Taking Every Set to Failure

Failure is a tool, not a requirement.

Use it selectively rather than automatically.

Constantly Changing Exercises

Advanced training benefits from exercise variety, but progression still requires consistency.

Keep major movements stable long enough to measure improvement.

Neglecting Weak Areas

Don’t allow your strongest movements to dominate the entire program.

Use accessory exercises and alternative movement patterns to address muscular or movement-pattern weaknesses.

Ignoring Joint Stress

Advanced lifters often move substantial loads repeatedly.

If an exercise consistently irritates a joint, investigate your technique, loading, range of motion, fatigue, and exercise selection rather than simply forcing yourself through it.

Confusing Fatigue With Progress

A workout doesn’t need to destroy you to be productive.

Judge training by long-term improvements in strength, muscle, technique, and performance—not simply by exhaustion.


Tips for Advanced Gym Trainees

  • Track loads, repetitions, sets, and RIR.
  • Use small, sustainable progression targets.
  • Give heavy compound lifts sufficient rest.
  • Keep technically demanding exercises controlled.
  • Use machines and cables strategically to add stimulus without unnecessary systemic fatigue.
  • Maintain both vertical and horizontal pushing and pulling patterns.
  • Include both knee-dominant and hip-dominant lower-body training.
  • Use unilateral exercises to complement bilateral strength work.
  • Don’t add advanced techniques simply because they’re advanced.
  • Adjust volume according to performance and recovery.
  • Eat enough protein and total calories for your goal.
  • Prioritize hydration and consistent sleep.
  • Deload when accumulated fatigue indicates that you need it.
  • Evaluate progress across months rather than individual sessions.

Final Thoughts

An At-Gym Advanced PPL Training Plan should provide more than simply heavier weights and higher volume. Advanced training requires deliberate exercise selection, appropriate intensity, fatigue management, sufficient recovery, and a progression strategy capable of producing small improvements over long periods.

The combination of strength-focused A workouts and hypertrophy-focused B workouts provides diverse training for the chest, shoulders, back, arms, quads, hamstrings, glutes, and calves while allowing compound and isolation movements to serve different purposes.

Choose the 3-day or 6-day option according to your recovery capacity, schedule, and other physical demands. Keep your major lifts measurable, use accessory exercises strategically, and adjust your workload when recovery begins to fall behind.

At the advanced level, progress may be slower—but it is still progress.

Train with precision. Progress with patience. Recover with purpose.


At-Gym Intermediate PPL Workout Plan (Push-Pull-Legs)

An At-Gym Intermediate PPL Workout Plan is designed for lifters who have already built a solid foundation in resistance training and are ready for greater training volume, exercise variety, and progressive overload.

This program divides training into Push, Pull, and Legs (PPL) and combines barbells, dumbbells, cables, and machines to develop strength and muscle across all major muscle groups.

You can follow a 3-day PPL option for more recovery or a 6-day PPL option featuring separate A and B workouts. The A and B sessions use different exercises and training angles, giving intermediate lifters more variety without unnecessarily repeating identical workouts.

Benefits of an At-Gym Intermediate PPL Workout Plan

  • Builds muscle and strength
  • Provides balanced full-body development
  • Trains major muscles through multiple movement patterns
  • Combines free weights, cables, and machines
  • Allows greater training volume than beginner programming
  • Makes progressive overload easy to track
  • Develops both vertical and horizontal pushing and pulling strength
  • Includes balanced quad, hamstring, glute, and calf training
  • Provides flexible 3-day and 6-day schedules
  • Builds a foundation for advanced resistance training

What Is a PPL Training Split?

PPL stands for Push, Pull, and Legs.

Each training day groups muscles that work together during similar movement patterns:

  • Push – Chest, shoulders, and triceps
  • Pull – Back, biceps, rear delts, and forearms
  • Legs – Quads, hamstrings, glutes, and calves

Intermediate trainees can benefit from using different exercises across the training week instead of performing the exact same session every time.

For that reason, this program contains:

  • Push A and Push B
  • Pull A and Pull B
  • Legs A and Legs B

The 3-day option alternates between the A and B workouts across weeks.

The 6-day option performs all six workouts within one week.


Equipment Needed

This program uses equipment commonly available in a commercial gym:

  • Barbell and Weight Plates
  • Squat or Power Rack
  • Adjustable Dumbbells
  • Flat and Adjustable Bench
  • Cable Machine
  • Pull-Up Bar
  • Lat Pulldown Machine
  • Seated Cable Row
  • Leg Press
  • Leg Extension Machine
  • Leg Curl Machine
  • Calf Raise Machine
  • Exercise Mat

You don’t need access to every exact machine. Exercises can be replaced with movements that train the same muscles and movement pattern when necessary.


Weekly Training Structure

Option 1 – 3-Day Intermediate PPL

  • Monday – Push
  • Tuesday – Rest
  • Wednesday – Pull
  • Thursday – Rest
  • Friday – Legs
  • Saturday – Rest or Light Activity
  • Sunday – Rest

Alternate between the A and B workouts:

Week 1: Push A, Pull A, Legs A

Week 2: Push B, Pull B, Legs B

Then repeat.

This gives you access to the full exercise selection while maintaining three weekly training days.

Option 2 – 6-Day Intermediate PPL

  • Monday – Push A
  • Tuesday – Pull A
  • Wednesday – Legs A
  • Thursday – Push B
  • Friday – Pull B
  • Saturday – Legs B
  • Sunday – Rest

Choose the schedule that allows you to train consistently while recovering sufficiently between sessions.


Pre-Workout Warm-Up Routine

Spend approximately 5–10 minutes preparing for your workout.

General Warm-Up

Perform 3–5 minutes of easy activity:

  • Treadmill Walking or Light Jogging
  • Stationary Cycling
  • Elliptical
  • Rowing Machine

You only need enough intensity to raise your body temperature and prepare for training.

Dynamic Mobility

Perform:

You don’t need to perform every drill before every workout. Give additional attention to the joints and movement patterns involved in that day’s session.

Exercise-Specific Warm-Up Sets

Before heavy compound exercises such as Bench Presses, Squats, Romanian Deadlifts, and Rows, gradually work toward your training weight with lighter sets.

Warm-up sets shouldn’t exhaust you.


Push A – Chest, Shoulders & Triceps

Push A emphasizes the Barbell Bench Press while providing additional chest, shoulder, and triceps volume.

Main Workout

  • Barbell Bench Press – 4 sets × 5–8 reps
  • Incline Dumbbell Press – 3 sets × 8–12 reps
  • Seated Dumbbell Shoulder Press – 3 sets × 8–12 reps
  • Cable Chest Fly – 2 sets × 10–15 reps
  • Dumbbell Lateral Raises – 3 sets × 12–20 reps
  • Cable Tricep Pushdowns – 3 sets × 10–15 reps

Rest 2–3 minutes after demanding compound exercises and approximately 60–120 seconds after isolation movements.

Optional Core Finisher

Pull A – Back, Biceps & Rear Delts

Pull A combines vertical and horizontal pulling with direct rear-delt and biceps training.

Main Workout

  • Pull-Ups or Lat Pulldowns – 4 sets × 6–10 reps
  • Barbell Rows – 3 sets × 6–10 reps
  • Seated Cable Rows – 3 sets × 8–12 reps
  • Face Pulls – 3 sets × 12–20 reps
  • Barbell or EZ-Bar Curls – 3 sets × 8–12 reps
  • Dumbbell Hammer Curls – 2 sets × 10–15 reps

Rest 2–3 minutes after demanding compound movements and 60–120 seconds after accessory exercises.

Keep your pulling exercises controlled. Avoid using excessive momentum simply to move heavier loads.

Optional Core Finisher

Legs A – Quad & Overall Lower-Body Strength

Legs A emphasizes squatting while still providing direct work for the hamstrings, glutes, and calves.

Main Workout

  • Barbell Back Squat – 4 sets × 5–8 reps
  • Romanian Deadlift – 3 sets × 8–12 reps
  • Leg Press – 3 sets × 10–15 reps
  • Seated or Lying Leg Curl – 3 sets × 10–15 reps
  • Leg Extension – 2 sets × 12–15 reps
  • Standing Calf Raises – 4 sets × 10–15 reps

Rest 2–3 minutes after Squats and Romanian Deadlifts and approximately 60–120 seconds after machine exercises.

Optional Core Finisher

  • Cable Crunches – 3 sets × 10–15 reps
  • Dead Bug – 2 sets × 10 reps each side

Push B – Shoulders, Chest & Triceps

Push B changes the pressing emphasis by prioritizing overhead pressing and using different chest and triceps exercises.

Main Workout

  • Barbell Overhead Press – 4 sets × 5–8 reps
  • Dumbbell Bench Press – 3 sets × 8–12 reps
  • Machine Chest Press – 3 sets × 8–12 reps
  • Cable Lateral Raises – 3 sets × 12–20 reps
  • Pec Deck or Cable Fly – 2 sets × 12–15 reps
  • Overhead Cable Tricep Extensions – 3 sets × 10–15 reps

Rest 2–3 minutes after Overhead Presses and approximately 60–120 seconds between accessory exercises.

Optional Core Finisher

  • Cable Woodchops – 3 sets × 10–15 reps each side
  • Hollow Body Hold – 3 sets × 20–40 seconds

Pull B – Back Thickness, Lats & Biceps

Pull B changes the pulling angles and adds chest-supported work to challenge the back without requiring your lower back to stabilize every row.

Main Workout

  • Chin-Ups or Neutral-Grip Lat Pulldowns – 3 sets × 6–10 reps
  • Chest-Supported Dumbbell Rows – 4 sets × 8–12 reps
  • Single-Arm Cable Rows – 3 sets × 10–15 reps each arm
  • Reverse Pec Deck – 3 sets × 12–20 reps
  • Incline Dumbbell Curls – 3 sets × 10–15 reps
  • Cable Hammer Curls – 2 sets × 10–15 reps

Rest 2–3 minutes after demanding compound pulling exercises and approximately 60–120 seconds after isolation movements.

Optional Grip Finisher

  • Farmer’s Carries – 3 sets × 30–45 seconds

Use a load you can carry with a stable torso and secure grip.

Optional Core Finisher

  • Hanging Leg Raises – 3 sets × 8–15 reps
  • Pallof Press – 3 sets × 10–15 reps each side

Legs B – Hamstrings, Glutes & Unilateral Strength

Legs B provides a different lower-body stimulus through unilateral training, hip extension, and additional hamstring work.

Main Workout

  • Hack Squat or Front Squat – 4 sets × 6–10 reps
  • Barbell Hip Thrust – 3 sets × 8–12 reps
  • Bulgarian Split Squats – 3 sets × 8–12 reps each leg
  • Seated Leg Curl – 3 sets × 10–15 reps
  • Leg Extension – 2 sets × 12–15 reps
  • Seated Calf Raises – 4 sets × 12–20 reps

Rest 2–3 minutes after demanding compound movements and approximately 60–120 seconds after isolation exercises.

If your gym doesn’t have a Hack Squat machine, use Front Squats or another controlled squat variation that fits your mobility and equipment.

Optional Core Finisher

  • Ab Wheel Rollouts – 3 sets × 6–12 reps
  • Side Plank – 2 sets × 30–45 seconds each side

Post-Workout Stretch Routine

After training, allow your heart rate and breathing to settle before performing static stretching.

Hold each stretch for approximately 20–30 seconds.

After Push Workouts

After Pull Workouts

After Leg Workouts

Stretch to a comfortable position rather than forcing additional range of motion.


How to Progress With This Program

Intermediate lifters need a measurable progression strategy rather than simply trying to make every workout harder.

Use Double Progression

For an exercise prescribed as:

Barbell Bench Press – 4 sets × 5–8 reps

You might progress:

7, 6, 6, 5 → 7, 7, 6, 6 → 8, 8, 8, 8

Once you reach the top of the range across your working sets with good technique, increase the weight slightly and begin progressing through the range again.

Add Weight Gradually

Use the smallest practical increase available.

Upper-body exercises may require smaller jumps than lower-body movements.

There’s no need to automatically add 2.5–5 kg every week if your current resistance is still challenging.

Improve Repetition Quality

Progress isn’t limited to adding weight.

You can also improve:

  • Range of motion
  • Stability
  • Technique
  • Control
  • Consistency between sets

Don’t Rush the Eccentric

Control the lowering phase of your exercises rather than allowing gravity to drop the weight.

You don’t need to deliberately turn every repetition into an extremely slow rep. Use a controlled tempo appropriate for the movement.


How Hard Should You Train?

Most working sets should be challenging, but you don’t need to reach complete muscular failure on every exercise.

A practical approach is to finish many sets with approximately 1–3 good repetitions still possible.

You may occasionally train closer to failure on controlled isolation or machine exercises, but compound lifts should remain technically sound.

If your form deteriorates substantially, the set is effectively over.


3-Day vs. 6-Day PPL: Which Should You Choose?

Choose the 3-day option if you:

  • Have limited training time
  • Participate in sports or other demanding activities
  • Prefer longer recovery periods
  • Are transitioning from beginner to intermediate training
  • Perform better with fewer weekly sessions

Choose the 6-day option if you:

  • Have a strong resistance-training foundation
  • Recover reliably between workouts
  • Want to distribute more weekly training across shorter sessions
  • Enjoy frequent gym training
  • Can consistently support your training with sufficient nutrition and sleep

Six training days aren’t automatically superior to three. The appropriate schedule is the one that lets you accumulate productive training while continuing to recover and progress.


Nutrition & Recovery

Training provides the stimulus for adaptation, but recovery supports your ability to perform and progress.

Protein

A daily protein intake around 1.6–2.2 grams per kilogram of body weight is a practical range for many resistance-trained people seeking to support muscle growth or retention.

Spread protein-rich foods across your meals rather than relying on one very large serving.

Calories

Your total calorie intake should match your goal.

  • Muscle Gain: A modest calorie surplus can support gradual weight and muscle gain.
  • Maintenance/Recomposition: Eating around maintenance while training consistently may suit some lifters.
  • Fat Loss: Use a sustainable calorie deficit while continuing resistance training and consuming adequate protein.

Hydration

Drink according to your activity, environment, sweat losses, and thirst rather than forcing yourself to consume the same arbitrary amount every day.

Training in hot conditions or sweating heavily will increase fluid needs.

Sleep

Aim for approximately 7–9 hours of sleep per night when possible.

Deloading

You don’t automatically need a deload every six or eight weeks.

Consider reducing training volume and/or intensity when accumulated fatigue is clearly affecting your performance and recovery.

Signs can include:

  • Persistent performance decline
  • Unusual fatigue
  • Repeatedly poor workouts
  • Persistent soreness
  • Reduced motivation to train

A lighter training week can then help reduce accumulated fatigue before normal progression resumes.


How Long Should You Follow This Plan?

Use the program for at least 8–12 weeks before making unnecessary major changes.

You can continue considerably longer if you’re still:

  • Adding repetitions or resistance
  • Improving exercise technique
  • Recovering properly
  • Building muscle or strength
  • Enjoying your training

There’s no requirement to replace a program simply because a certain number of weeks has passed.


Common Intermediate Training Mistakes

Adding Too Much Volume

More sets don’t automatically produce more progress.

Add training volume only when you can recover from it and have a reason to increase it.

Turning Every Workout Into a Max-Effort Session

Hard training matters, but repeatedly testing your limits can interfere with consistent progression.

Train hard enough to stimulate adaptation without treating every session as a competition.

Changing Exercises Too Frequently

Exercise variety is useful, but constantly replacing movements makes progression difficult to measure.

Keep your main exercises stable long enough to improve them.

Neglecting Technique as Loads Increase

Your technique shouldn’t progressively deteriorate as your strength improves.

Maintain control as resistance increases.

Ignoring Weak Movement Patterns

Don’t build your entire routine around your strongest exercises.

Balanced training should include horizontal and vertical pushing and pulling, knee-dominant lower-body work, hip hinges, unilateral exercises, and appropriate isolation work.

Ignoring Recovery

Training six days per week doesn’t mean recovery stops mattering.

Nutrition, sleep, stress management, and appropriate workload all influence how well you adapt.


Tips for Intermediate Gym Trainees

  • Keep a detailed training log.
  • Progress weight or repetitions gradually.
  • Give compound exercises enough rest between sets.
  • Prioritize technique over ego lifting.
  • Use a full, controlled range of motion appropriate for each exercise.
  • Don’t take every set to failure.
  • Keep your main compound exercises relatively consistent.
  • Use isolation exercises to complement—not replace—compound movements.
  • Adjust volume when recovery begins to decline.
  • Eat enough protein and total calories for your goal.
  • Stay adequately hydrated.
  • Prioritize consistent sleep.
  • Judge progress across months rather than individual workouts.

Final Thoughts

An At-Gym Intermediate PPL Workout Plan provides the structure, exercise variety, and progression opportunities needed to continue developing after you’ve established the fundamentals of resistance training.

By combining barbells, dumbbells, cables, machines, compound movements, isolation exercises, and a clear progressive-overload strategy, you can continue building strength and muscle while maintaining balanced development across your entire body.

Choose the 3-day or 6-day option according to your schedule and recovery capacity. Train hard enough to create a meaningful stimulus, but don’t confuse unnecessary exhaustion with productive training.

Track your lifts, progress gradually, recover properly, and give the program enough time to work.

How to Do a Side Plank Correctly: Step-by-Step Guide for Beginners

Learn how to do a side plank with perfect form, avoid common mistakes, and discover the best variations to build a strong, stable core.

The side plank is one of the most effective bodyweight exercises for developing core stability, strengthening the obliques, and improving overall balance. Whether you are training for military fitness tests, calisthenics, or athletic performance, mastering the side plank is essential.


What Is a Side Plank?

A side plank is a bodyweight exercise where you support your body on one forearm (or hand) while keeping your body in a straight line from head to feet.

Unlike traditional planks, the side plank specifically targets the obliques and lateral core muscles.

Side planks are commonly used in:

  • Core strengthening workouts
  • Rehabilitation and injury prevention programs
  • Athletic performance training
  • Military fitness routines

This exercise builds real core stability that translates directly into strength and balance.

Benefits of Side Planks

  • Strengthens obliques and lateral core
  • Improves balance and stability
  • Enhances posture and spinal support
  • Reduces risk of lower back injuries
  • Builds core endurance
  • Essential for military and tactical fitness

Few exercises target the side core as effectively as the side plank.

Muscles Worked in Side Planks

Side planks activate multiple core and stabilizing muscles.

Primary Muscles
  • Obliques (Internal and External)
  • Transverse Abdominis
Secondary Muscles
  • Rectus Abdominis
  • Glutes
  • Shoulders (Deltoids)
  • Lower Back Stabilizers

This makes the side plank highly effective for building a strong, balanced core.


How to Do a Side Plank (Step-by-Step)

Step 1: Position Your Body

Lie on your side with your legs extended and stacked on top of each other.

Place your forearm directly under your shoulder.

Tip: Keep your elbow aligned with your shoulder to avoid strain.

Step 2: Lift Your Hips

Push through your forearm and lift your hips off the ground.

  • Body forms a straight line
  • Core is engaged
  • Neck stays neutral

Step 3: Hold the Position

Maintain the side plank position while keeping:

  • Hips elevated
  • Core tight
  • Body aligned

Avoid letting your hips drop.

Warrior showcasing How to do a Side Plank with correct form

Step 4: Breathe and Stay Controlled

Breathe steadily while holding the position.

Do not hold your breath — controlled breathing improves endurance.

Step 5: Lower With Control

Slowly lower your hips back to the ground.

Switch sides and repeat.


Side Plank Form Checklist

Use this checklist to ensure perfect form:

  • Keep your body in a straight line
  • Engage your core and glutes
  • Keep your elbow under your shoulder
  • Avoid dropping your hips
  • Maintain steady breathing

Perfect form builds stability and prevents injury.


Common Side Plank Mistakes

Dropping the Hips

Problem: Reduces core activation.

Fix: Keep hips lifted and body aligned.

Shoulder Misalignment

Problem: Causes shoulder strain.

Fix: Keep your elbow directly under your shoulder.

Twisting the Body

Problem: Reduces effectiveness.

Fix: Keep your chest facing forward and body stacked.

Holding Breat

Problem: Reduces endurance.

Fix: Breathe steadily throughout the hold.

Short Hold Times

Problem: Limits progress.

Fix: Gradually increase hold duration.


Side Plank Variations

Once you master the basic side plank, these variations can increase difficulty and effectiveness.

Bent-Knee Side Plank (Beginner Variation)

An easier version for beginners.

How to Do Bent-Knee Side Plank

  • Bend your knees at 90 degrees
  • Lift your hips while keeping your knees on the ground
  • Maintain a straight line from head to knees

Side Plank with Leg Raise

Adds intensity and balance challenge.

How to Do Side Plank with Leg Raise

  • Perform a standard side plank
  • Raise your top leg upward
  • Keep movement controlled

High Side Plank (Straight Arm)

Increases shoulder engagement.

How to Do High Side Plank

  • Support your body on your hand instead of your forearm
  • Keep your arm fully extended
  • Maintain full-body alignment

Weighted Side Plank

Adds resistance for advanced strength.

How to Do Weighted Side Plank

  • Place a lightweight on your hip
  • Hold the side plank position
  • Maintain strict form

Final Thoughts

The side plank is one of the most effective core stability exercises you can master.

It builds:

  • Oblique strength
  • Core stability
  • Balance and coordination
  • Shoulder stability
  • Functional athletic strength

Progress may feel difficult at first, especially when holding the position for longer durations. However, with consistent training and proper form, your endurance and stability will steadily improve. Learn more about Core Workouts here.

Focus on control and alignment.

A warrior builds strength from the core — solid and unbreakable.

Essential Gear for Side Planks

While side planks require no equipment, a few simple items can improve comfort, make advanced variations more challenging, and support long-term progress.

  • Exercise Mat: Cushions your forearm and elbow against hard floors, making longer holds much more comfortable.
  • Medicine Ball: Perfect for adding resistance during weighted side planks to build greater core strength.
  • Resistance Bands: Great for advanced side plank variations, such as leg raises with band resistance, to increase glute and hip stability.
  • Push-Up Bars or Parallettes: Great for high side plank variations, providing a more comfortable grip while reducing wrist strain during longer holds and advanced progressions.

Master the movement with perfect bodyweight form first, then gradually introduce equipment as your strength and stability improve.


Side Plank FAQ

Q1: How long should beginners hold a side plank?
Beginners can start with 15–30 seconds per side. Gradually increase to 45–60 seconds as strength improves.

Q2: Are side planks better than regular planks?
Both are effective. Side planks target the obliques more, while regular planks focus on the entire core.

Q3: How often should I do side planks?
You can train side planks 3–5 times per week as part of your core routine, depending on recovery.

How to Do Flutter Kicks Correctly: Step-by-Step Guide for Beginners

Learn how to do flutter kicks with perfect form, avoid common mistakes, and discover the best variations to build a strong, defined core.

Flutter kicks are one of the most effective bodyweight exercises for developing core strength, improving endurance, and building lower abdominal definition. Whether you are training for military fitness tests, calisthenics, or athletic performance, mastering flutter kicks is essential.


What Are Flutter Kicks?

Flutter kicks are a bodyweight core exercise where you lie on your back and alternate lifting your legs up and down in a controlled kicking motion.

This movement primarily targets the lower abs while also engaging the hip flexors and stabilizing muscles.

Flutter kicks are commonly used in:

  • Military fitness training
  • Core strengthening workouts
  • Endurance and conditioning programs
  • Athletic performance training

Unlike many ab exercises, flutter kicks build core endurance and control, which is crucial for real-world performance.

Benefits of Flutter Kicks

  • Strengthens lower abdominal muscles
  • Improves core endurance
  • Enhances hip flexor strength
  • Supports better posture and stability
  • Builds muscular control and coordination
  • Essential for military and tactical fitness tests

Few exercises challenge the lower abs as effectively as flutter kicks.

Muscles Worked in Flutter Kicks

Primary Muscles
  • Lower Abdominals
  • Rectus Abdominis
Secondary Muscles
  • Hip Flexors
  • Obliques
  • Quadriceps
  • Lower Back Stabilizers

This makes flutter kicks highly effective for building a strong, stable core.


How to Do Flutter Kicks (Step-by-Step)

Step 1: Lie Flat on the Ground

Lie on your back with your legs fully extended and arms placed by your sides or under your hips for support.

Tip: Keep your lower back pressed into the ground.

Step 2: Lift Your Legs Slightly Off the Ground

Raise both legs a few inches off the ground.

  • Keep legs straight
  • Toes pointed forward
  • Core engaged

This is your starting position.

Step 3: Begin the Kicking Motion

Alternate lifting one leg while the other lowers slightly.

  • Keep movements small and controlled
  • Do not let your heels touch the ground

Step 4: Maintain Core Engagement

Throughout the movement:

  • Keep your core tight
  • Lower back stays pressed down
  • Avoid arching your spine

Step 5: Control the Movement

Continue alternating kicks in a steady rhythm.

Avoid rushing — controlled reps build more strength and endurance.

Warrior showcasing How to do Flutter Kicks with proper form

Flutter Kicks Form Checklist

Use this checklist to ensure perfect form:

  • Keep your lower back pressed into the ground
  • Engage your core throughout
  • Use small, controlled kicks
  • Keep legs straight
  • Avoid letting heels touch the ground

Perfect form builds stronger abs and prevents injury.


Common Flutter Kicks Mistakes

Arching the Lower Back

Problem: Reduces core activation and causes strain.

Fix: Keep your lower back pressed firmly into the ground.

Kicking Too Fast

Problem: Reduces control and effectiveness.

Fix: Use a slow, controlled tempo.

Raising Legs Too High

Problem: Shifts focus away from lower abs.

Fix: Keep legs low to maximize core tension.

Bending the Knees

Problem: Reduces tension on the abs.

Fix: Keep legs straight throughout the movement.

Not Engaging the Core

Problem: Turns it into a leg exercise.

Fix: Actively tighten your abs during every rep.


Flutter Kick Variations

Once you master basic flutter kicks, these variations can increase difficulty and effectiveness.

Scissor Kicks

Scissor kicks involve crossing your legs over each other, increasing core engagement.

How to Do Scissor Kicks

  • Lift legs slightly off the ground
  • Cross one leg over the other alternately
  • Keep movements controlled

Elevated Flutter Kicks

This variation increases difficulty by raising your upper body.

How to Do Elevated Flutter Kicks

  • Lift your shoulders slightly off the ground
  • Perform flutter kicks while holding the crunch position
  • Keep your core tight

Weighted Flutter Kicks

Adds resistance for increased strength.

How to Do Weighted Flutter Kicks

  • Place light ankle weights or hold a small weight between your feet
  • Perform controlled kicks
  • Maintain strict form

Bent-Knee Flutter Kicks (Beginner Variation)

Easier version for beginners.

How to Do Bent-Knee Flutter Kicks

  • Slightly bend your knees
  • Perform smaller kicks
  • Focus on core engagement

Final Thoughts

Flutter kicks are one of the most powerful core exercises you can master.

They build:

  • Lower ab strength
  • Core endurance
  • Hip flexor strength
  • Stability and control
  • Functional athletic performance

Progress may feel challenging at first, especially for beginners. However, with consistent training and proper form, your core strength will steadily improve. Learn more about Core Workouts here.

Focus on control, not speed.

A warrior trains the core with discipline — not shortcuts.

Essential Gear for Flutter Kicks

Using the right equipment can make flutter kick training more comfortable, effective, and easier to progress as your core strength and endurance improve.

  • Exercise Mat: The most essential piece of equipment for flutter kicks. It provides a comfortable, cushioned surface that supports your back and tailbone during floor-based core exercises.
  • Ankle Weights: Ideal for weighted flutter kick variations, adding resistance to help build greater lower abdominal strength and hip flexor endurance.
  • Resistance Bands: Perfect for adding resistance to advanced core exercises and improving lower-body strength through controlled movements.
  • Foam Roller: Useful for loosening the hip flexors, quadriceps, and lower back before training, helping improve mobility and making flutter kicks more comfortable.
  • Yoga Block: Great for beginners who need extra support under the hips to maintain proper lower back alignment while learning the movement.

Flutter Kicks FAQ

Q1: How long should beginners do flutter kicks?
Beginners can start with 20–30 seconds per set. Gradually increase to 45–60 seconds as strength improves.

Q2: Are flutter kicks good for abs?
Yes, flutter kicks are excellent for targeting the lower abs and building core endurance.

Q3: How often should I do flutter kicks?
You can train flutter kicks 3–5 times per week as part of your core routine. Ensure proper recovery and avoid overtraining.